The front page
The front page, by default, displays a list of the most recent posts. Although the number of posts is configured through WordPress, the order and layout is fixed by the theme and by index.php. We’ve already looked at this file before, so I will extract the post section:
<div id="content" class="narrowcolumn">
<?php if (have_posts()) : ?>
<?php while (have_posts()) : the_post(); ?>
<div class="post">
<h2 id="post-<?php the_ID(); ?>"><a href="<?php the_permalink() ?>" rel="bookmark" title="Permanent Link to <?php the_title(); ?>"><?php the_title(); ?></a></h2>
<small><?php the_time('F jS, Y') ?> <!-- by <?php the_author() ?> --></small>
<div class="entry">
<?php the_content('Read the rest of this entry »'); ?>
</div>
<p class="postmetadata">Posted in <?php the_category(', ') ?> <strong>|</strong> <?php edit_post_link('Edit','','<strong>|</strong>'); ?> <?php comments_popup_link('No Comments »', '1 Comment »', '% Comments »'); ?></p>
<!--
<?php trackback_rdf(); ?>
-->
</div>
<?php endwhile; ?>
<div class="navigation">
<div class="alignleft"><?php posts_nav_link('','','« Previous Entries') ?></div>
<div class="alignright"><?php posts_nav_link('','Next Entries »','') ?></div>
</div>
<?php else : ?>
<h2 class="center">Not Found</h2>
<p class="center"><?php _e("Sorry, but you are looking for something that isn't here."); ?></p>
<?php include (TEMPLATEPATH . "/searchform.php"); ?>
<?php endif; ?>
</div>
There’s a fair amount of PHP code here but we can break it down into a few logical steps:
- If there are posts (line 3)
- Start the loop (line 4)
- Call ‘
the_post’ to get post data (line 4) - Print the post (lines 5 to 19)
- Print navigation links (lines 23 to 26)
- Call ‘
- End the loop (line 34)
- Start the loop (line 4)
- else print message saying no posts and include a search option
It should be noted that nothing about index.php is mandatory, other than the name. The code can be changed to display as much or as little information as is desired, and can be extended to display a much more complicated selection of posts. It is even possible to run The Loop several times – each pass could display a certain subset of posts, maybe restricted to categories or authors. The possibilities are endless.
For the moment we will continue to look at how Kubrick deals with the front page. The Loop has been extracted from the rest of the code and is shown below:
<?php while (have_posts()) : the_post(); ?>
<div class="post">
<h2 id="post-<?php the_ID(); ?>"><a href="<?php the_permalink() ?>" rel="bookmark" title="Permanent Link to <?php the_title(); ?>"><?php the_title(); ?></a></h2>
<small><?php the_time('F jS, Y') ?> <!-- by <?php the_author() ?> --></small>
<div class="entry">
<?php the_content('Read the rest of this entry »'); ?>
</div>
<p class="postmetadata">Posted in <?php the_category(', ') ?> <strong>|</strong> <?php edit_post_link('Edit','','<strong>|</strong>'); ?> <?php comments_popup_link('No Comments »', '1 Comment »', '% Comments »'); ?></p>
<!--
<?php trackback_rdf(); ?>
-->
</div>
<?php endwhile; ?>
You can see that The Loop starts with the while construct mentioned earlier:
while (have_posts()) : the_post ()
It may be useful to know that the colon and endwhile are a PHP alternative to using curly braces. Either is acceptable and in this case the colon and endwhile were chosen because it is easy to loose braces in a mass of HTML and PHP code. The code could just as easily be written as:
while (have_posts ()) {
  the_post ();
}
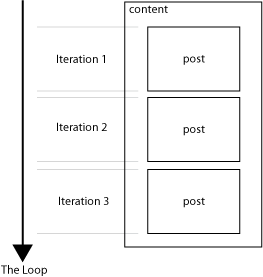
After retrieving the post information using the_post, the code displays everything inside a div with a class of ‘post’. The front page will therefore consist of the wrapping ‘content’ div, and inside this will be many occurrences of ‘post’, with individual post information contained therein.
The current Kubrick layout of a post will display:
- Title
- Date
- Content
- Meta-data (categories and comments)
- Trackback information
Ignoring the surrounding HTML, you will see that the PHP used to achieve this includes functions such as: the_title, the_date, the_permalink. These are WordPress template functions and display certain information about the current post. Each iteration through the loop will cause the functions to display information specific for that post.
Analyzing WordPress functions
We can generally infer the purpose of most template functions from its name. The Codex has a full list and it is not necessary to reproduce that here. Instead we will look at some of the more interesting ones.
The first is the_ID:
<h2 id="post-<?php the_ID(); ?>">
This displays the unique database ID for the post and is used here to create an element anchor. This is where an HTML element is given an ID such that we can refer to it uniquely from a hyperlink.
For example, if the current post has an ID of 574, then the above code would produce:
<h2 id=”post-574”>
This then allows us to link directly to this post:
<a href=”#post-574”>
Another function worth mentioning is this:
<!-- by <?php the_author() ?> -->
Although the function itself is self-explanatory, it is included within HTML comments. Because it is a PHP function it will still get executed, and the author of the post will appear within the raw HTML, but will not be visible. The theory is that most blogs are created by a single author, so there is no need to keep displaying the same information. If you have multiple authors then you can remove the comments and have the author displayed.
The content is displayed with this:
the_content('Read the rest of this entry »');
If the post contains a <!--more--> tag then the content will include everything up to the tag. The tag itself will be replaced with the argument passed to the function, which will be displayed as a link to the rest of the post. You can change this to anything you want.
This next function adds the edit links to a post, but only if the user is allowed to edit them:
<?php edit_post_link('Edit','','<strong>|</strong>'); ?>
The first argument defines the link text as ‘Edit’, the second defines what appears before this (nothing), and third what appears after. In this instance, Kubrick prints a bold vertical bar after the link.
Next up is a function to display the number of comments:
<?php comments_popup_link('No Comments »', '1 Comment »','% Comments »'); ?>
Three arguments are given, detailing what to print if there are no comments, one comment, or multiple comments.
Digging a little deeper into the comments functionality, it seems that the comments_popup_link function works differently if the comments_popup_script function has been called previously.
For example, the code could be changed as follows:
<?php comments_popup_script () ?>
<?php comments_popup_link('No Comments »', '1 Comment »','% Comments »'); ?>
This time instead of the link taking you to the comments section at the bottom of the post, it will open a new window that only contains comments. The comments are still visible at the bottom of a post when viewed on a single page, so this functionality is optional. If you include it then you should change the style of the popup comments window by modifying comments-popup.php in your theme.
Finally there is a function for trackbacks:
<!-- <?php trackback_rdf(); ?> -->
This is included within an HTML comment for a reason – it’s not supposed to be visible to a viewer! All it does is provide information for trackbacks. If you want to disable trackbacks entirely then you can delete this and save some of your download bandwidth.
Navigation
Following the posts are two navigational links:
<div class="navigation">
<div class="alignleft">
<?php posts_nav_link('','','« Previous Entries') ?>
</div>
<div class="alignright">
<?php posts_nav_link('','Next Entries »','') ?>
</div>
</div>
These provide ‘previous’ and ‘next’ links to earlier and later posts by using the posts_nav_link function. This is well documented in the Codex and does not require any further description.
Superb, Stunning and Diligent… I was just looking how to design a WordPress theme from my HTML template and this is one tutorial which was just perfect. Thanks for all the painstaking documentation. God Bless!
Thank YOU!
I thought I knew CSS but one look at the Kubrick style.css made wonder whether I really knew it. Anyway, that look was enough to put aside the theme redesign project I had in mind, particularly when I found that whatever changes I make to the stylesheet, the header had the same blue background. It was only when I went through your tutorial that I really was able to identify the problem and go to the Admin panel of wordpress.
Your tutorial provided many more such insights into small details with big impact.
Above all, it provided the confidence to start on the theme redesign project.
Once again, Thank YOU!