Translation:
Resources:
Life as a WordPress blogger has become remarkably easy. If you can hold a mouse and follow instructions then you’re most of the way towards carving out your own niche on the internet. A fresh installation gives you a powerful and attractive system with minimal effort, and with a little luck you can be blogging in under half an hour.
Despite the availability of hundreds of themes, and the general goodness of the default Kubrick theme, sometimes you just want to give your blog that personal touch, and the only way to do this is by going under the hood and having a look around.
A month in to running a WordPress-based website and I find myself doing the very same thing. None of the themes were exactly what I was looking for, and after investigating the internals of WordPress I realised it was a lot more involved than it initially appeared. I could certainly imagine a beginner being overwhelmed by the mass of acronyms and incongruent technologies.
With this in mind I decided to write a guide that would help not only myself, but might also help others who have been put off trying to experiment with WordPress. I make no claims of being a style guru and will rely on common sense and basic design principles.
In writing this I will assume a rudimentary knowledge of HTML and CSS. I will attempt to annotate all the important parts. The guide will begin slowly, but should speed up once a level of comfort has been reached.
Rather than starting a theme from scratch, and having to explain everything, I will instead focus on dissecting an existing theme and explaining parts as they are required. From a personal point of view, I find it easier to learn things by focussing on the small details, and ignoring everything else. In this instance I will be using the default WordPress 1.5 theme Kubrick.
Diagrams will be used where necessary, and annotated code will be available. The different stages will be available to download using the links in the menu on the right of each page.
The first part of this guide is split into two steps, and will result in a basic site with a minimum of style – it will be fully usable, if not particularly attractive. Future guides will dissect the theme further, and make it look more attractive.
Step 1: Pulling it apart
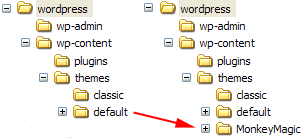
The first step is to make a copy of the default theme. All themes are found in the wp-content/themes directory. Here Ive simply copied the default theme and renamed it to MonkeyMagic:
Cleaning the theme
Now we need to clean the theme in order to make it our own. Every theme has a piece of information that tells WordPress what the theme is called, who wrote it, as well as containing other details such as version and description. This information is displayed by WordPress in the administration presentation section, and a theme will not work without it. The information is defined at the start of the file style.css. Its important that we dont get confused with the existing Kubrick style, so the best thing is to delete the style.css, and create a new one:
/*
Theme Name: MonkeyMagic
Theme URI: http://urbangiraffe.com/
Description: Theme dissection example
Version: 1.0
Author: John Godley
Author URI: http://urbangiraffe.com/
*/
Make sure you save this in the MonkeyMagic theme directory, and not the default one!
Removing Kubrick
Next we need to remove some Kubrick specific styles in the file header.php. Dont worry about the details here, its just necessary we lose all styles.
Delete from line 17 to 48 (inclusive).
<!DOCTYPE html PUBLIC "-//W3C//DTD XHTML 1.0 Transitional//EN" "http://www.w3.org/TR/xhtml1/DTD/xhtml1-transitional.dtd">
<html xmlns="http://www.w3.org/1999/xhtml">
<head profile="http://gmpg.org/xfn/11">
<meta http-equiv="Content-Type" content="<?php bloginfo('html_type'); ?>; charset=<?php bloginfo('charset'); ?>" />
<title><?php bloginfo('name'); ?> <?php if ( is_single() ) { ?> » Blog Archive <?php } ?> <?php wp_title(); ?></title>
<meta name="generator" content="WordPress <?php bloginfo('version'); ?>" /> <!-- leave this for stats -->
<link rel="stylesheet" href="<?php bloginfo('stylesheet_url'); ?>" type="text/css" media="screen" />
<link rel="alternate" type="application/rss+xml" title="RSS 2.0" href="<?php bloginfo('rss2_url'); ?>" />
<link rel="alternate" type="text/xml" title="RSS .92" href="<?php bloginfo('rss_url'); ?>" />
<link rel="alternate" type="application/atom+xml" title="Atom 0.3" href="<?php bloginfo('atom_url'); ?>" />
<link rel="pingback" href="<?php bloginfo('pingback_url'); ?>" />
<style type="text/css" media="screen">
/* BEGIN IMAGE CSS */
/* To accomodate differing install paths of WordPress, images are referred only here,
and not in the wp-layout.css file. If you prefer to use only CSS for colors and what
not, then go right ahead and delete the following lines, and the image files. */
body { background: url("<?php bloginfo('stylesheet_directory'); ?>/images/kubrickbgcolor.jpg"); } <?php /* Checks to see whether it needs a sidebar or not */ if ((! $withcomments) && (! is_single()) && (! is_page())) { ?>
#page { background: url("<?php bloginfo('stylesheet_directory'); ?>/images/kubrickbg.jpg") repeat-y top; border: none; } <?php } else { // No sidebar ?>
#page { background: url("<?php bloginfo('stylesheet_directory'); ?>/images/kubrickbgwide.jpg") repeat-y top; border: none; } <?php } ?>
#header { background: url("<?php bloginfo('stylesheet_directory'); ?>/images/kubrickheader.jpg") no-repeat bottom center; }
#footer { background: url("<?php bloginfo('stylesheet_directory'); ?>/images/kubrickfooter.jpg") no-repeat bottom; border: none;}
/* Because the template is slightly different, size-wise, with images, this needs to be set here
If you don't want to use the template's images, you can also delete the following two lines. */
#header { margin: 0 !important; margin: 0 0 0 1px; padding: 1px; height: 198px; width: 758px; }
#headerimg { margin: 7px 9px 0; height: 192px; width: 740px; }
/* END IMAGE CSS */
/* To ease the insertion of a personal header image, I have done it in such a way,
that you simply drop in an image called 'personalheader.jpg' into your /images/
directory. Dimensions should be at least 760px x 200px. Anything above that will
get cropped off of the image. */
/*
#headerimg { background: url('<?php bloginfo('stylesheet_directory'); ?>/images/personalheader.jpg') no-repeat top;}
*/
</style>
<?php wp_get_archives('type=monthly&format=link'); ?>
<?php wp_head(); ?>
</head>
<body>
<div id="page">
<div id="header">
<div id="headerimg">
<h1><a href="<?php echo get_settings('home'); ?>"><?php bloginfo('name'); ?></a></h1>
<div class="description"><?php bloginfo('description'); ?></div>
</div>
</div>
<hr />
Ugh…think I’m kinda/sorta getting through the first section of the tutorial. Then I’ve followed the directions for adding #wrapper to the style sheet. When I’ve checked the results, the footer moved to the right of the sidebar. If I reduce the browser window size, it kinda/sorta shifts most of the footer back to the bottom…but for the most part, the footer is to the right of the sidebar.
What am I’m doing wrong?? Did this three times in a row, and I’m a bit paralyzed until I know how to fix this. Thanks!
One more thing…the footer’s yellow rectangle box is just below the header…far away from the footer, and no contents except for it interfering with the posts and sidebar texts. Clues??
Julie: I haven’t updated the guide for WP 2 yet, but it won’t make a lot of difference when it comes to themes as they have not changed much. I do intend to cover the new stuff in the future, and it will be based upon what’s already here (they haven’t changed things that much!)
Velanche: Make sure the quotes in your HTML are the correct ones – they need to be straight ” and not ‘fancy’ ones. There’s a previous comment about this with more information.
THANKYOU! I’ve been looking forever for something like this, and your tutorial made customizing my wordpress theme so simple… I’m working on changing my entire site over to wordpress and you’ve saved me hours of bashing my computer trying to get things done.
thanks again. =)
Great tutorial!! Just wanted to let you know your Example Theme links go to a 404 error…..
[…] UrbanGiraffe » Dissection of a WordPress theme: Part 1 UrbanGiraffe » Dissection of a WordPress theme: Part 2 : 2005. 4. 22 추가. (ë”°ë¼í•´ ë³´ê³ ìžˆë‹¤. 훌ë¥í•œ ì„ ìƒë‹˜ì´ë‹¤.) UrbanGiraffe » Dissection of a WordPress theme: Part 3 : 2005. 4. 30 추가. (ì´ ê°•ì¢Œë¥¼ ë”°ë¼ í…Œë§ˆë¥¼ 만들어 ë³´ê³ ìžˆë‹¤. 사ì´ë“œë°” ì € ì•„ëž˜ìª½ì— theme switcherê°€ ìžˆëŠ”ë° xxiaa_testê°€ 바로 ê·¸ 결과물. 강좌가 진행중ì´ë¼ 테마 ì—ì‹œ 미완성ì´ë‹¤.) UrbanGiraffe » Dissection of a WordPress theme: Part 4 : 2005. 5. 20 추가. […]
Thanks John! This was EXACTLY the kind of help I was looking for!
If it wasn’t for your tutorial(s), I would have given up on WordPress. I used all of them, the Blank Template, and the Codex to create my own weblog template. There’s still quite a bit of bugs, and it doesn’t quite work well in Internet Explorer, but I’m happy with the outcome.
I’ve been trying to breakdown your Giraffe2 theme, but I’m afraid it far beyond me at this point. I was, however, able to figure out how to make two loops and create that “featured” post effect you have–the part caught my eye more than anything.
I’m not sure how many times you check your weblog, but if you could take a look at mine and suggest some improvement methods, I would be eternally grateful.
Amazing and helpful work here.
Trish: Thanks! A missing quote caught me out
Matthew: From your website I can just see the result of your theme (as opposed to the theme code), so can only really judge the design and layout. It’s looking very clean and readable and and the only thing I can suggest is that the bottom posts have more left padding!
[…] * Template Files * Stepping Into Templates * Stepping Into Template Tags * Template Tags * Developing WordPress Themes * The Loop in Action * Template Tag Layout in simple to read form (http://guff.szub.net/wordpress/template-tags/) * Anatomy of a WordPress Theme (http://boren.nu/archives/2004/11/10/anatomy-of-a-wordpress-theme/) * Templates and the is functions (http://boren.nu/archives/2004/10/16/templates-and-the-is-functions/) * Dissection of a WordPress Theme (http://www.urbangiraffe.com/2005/04/12/themeguide1/1/) […]
So easy stuff! But I couldn’t see the codes for the index.php on pages 4 and 6
[…] UrbanGiraffe » Dissection of a WordPress theme: Part 1 […]
[…] http://www.urbangiraffe.com/2005/04/12/themeguide1/ […]
[…] Questo documento è la traduzione della guida originale Dissection of a WordPress Theme realizzata da John Godley che ne è anche il detentore del copyright. Ogni riproduzione della pagina originale e/o di questa traduzione è subordinata al preventivo assenso dell’autore. – This guide is the translation of the guide Dissection of a WordPress Theme by John Godley who is the owners of the copyright. Any reproduction of the original page and/or the translated page is allowed only with the permission of the author. […]
Thanks. I’m having some ongoing server issues. Bear with me
Loving the guide, but am momentarily frustrated as my layout is totally wonky at the moment, and I’m not sure how to fix it (due to the code missing on page 6). Is there something temporay until server issues are resolvd?
[…] http://www.urbangiraffe.com/2005/04/12/themeguide1/ […]
Should all be fixed now Annie (the server was beaten back into shape)
[…] Nu har jag bestämt mig…. Jag ska försöka göra ett eget tema..med tips frÃ¥n UrbanGiraffe. SÃ¥ nu har jag fixat en till wordpress-blogg. Det är lika bra att ha tvÃ¥, ifall jag sabbar nÃ¥gonting i mina tappra försök att fÃ¥ till koder och annat. DÃ¥ gör det inget att det blir fel, den här är ju intakt iallafall. I den andra kan jag dona bäst jag vill, för att fÃ¥ till layouten som jag vill ha det. SÃ¥ nu ska här css:as och testas och “ritas” i Photoshop och PSP. […]
[…] ì›Œë“œí”„ë ˆìŠ¤ 테마 ê°€ì´ë“œÂ […]
[…] Dissection of a WordPress theme: Part 1 Dissection of a WordPress theme: Part 2 […]
[…] I’m feeling pretty proud of myself right now. After a couple of days of reading, pulling of hair and gnashing of teeth, I have finally gotten the basic layout I am looking for. By this time I almost have the information at Urban Giraffe memorized. I designed the graphics and worked up the style sheet with a few tweaks of my own based on what I learned in his Dissection of a WordPress theme. Oh, having the local server on my computer saved me a load of time and bandwidth. I also did a fair share of reading at the WordPressMU forums and Google also got a bit of a workout. […]
[…] Seems it has been awhile since my last post, but I think you can see the progress I have made. Thanks to the wonderful information I found at Urban Giraffe and on the Word Press forums I have been able to design a new look for the site. I must say that up to this point I am pretty proud of myself. To be totally honest, I have only touched the tip of the iceburg on what can be done using Word Press. Over the next few weeks I hope to dig a bit deeper into the Codex and continue learning how to use this powerful software. […]
John:
Outstanding! Very well written and precise. One question: what HTML / PHP IDE or editor do you use — see header.php screenshot in Removing Kubrick section (above).
To edit themes and such like I use a combination of Eclipse (with PhpEclipse) and Ultraedit – light and heavyweights!
Hi, your Theme is 1. nice , 2. seo friendly, 3. great job 🙂
Thanks Ferienwohnung
[…] converting Gscape opensource template to a basic wordpress theme. this template was created by Gururaj and was found here on OSWD. As well as the wordpress codex I also used information from the following blogs – AndrewStrojney.com, Leon Kilat ::: The Cybercafe Experiments, UrbanGiraffe, and Lorelle on WordPress. […]
Indespensable startup guide to custom theme design. Nice work. Spent 2 hours on the WP codex site trying to feel out a strategy for custom design, and 20 minutes here. Thanks for the article!
[…] WordPress theme ‘anatomy’: Theme Development, Blog Design and Layout, Anatomy of a WordPress Theme and Visual Anatomy of a WP 1.5 theme (still good info). Last, but not least: Dissection of a WordPress theme: Part 1. […]
[…] This template was created by Gururaj and was found here on OSWD. As well as the wordpress codex I also used information from the following blogs – AndrewStrojney.com, Leon Kilat ::: The Cybercafe Experiments, UrbanGiraffe, and Lorelle on WordPress. […]
[…] This template was created by Gururaj and was found here on OSWD. As well as the wordpress codex I also used information from the following blogs – AndrewStrojney.com, Leon Kilat ::: The Cybercafe Experiments, UrbanGiraffe, and Lorelle on WordPress. […]
[…] Converting HTML template to WordPress Theme (Part 1) This template was created by Gururaj and was found here on OSWD. As well as the wordpress codex I also used information from the following blogs – AndrewStrojney.com, Leon Kilat ::: The Cybercafe Experiments, UrbanGiraffe, and Lorelle on WordPress. […]
[…] Dissection of a WordPress Theme (http://www.urbangiraffe.com/2005/04/12/themeguide1/1/) [edit] […]
[…] want to learn modify your theme? you have to learn the structure of wordpress first. here(http://codex.wordpress.org/WordPress_Lessons) and also you can read those: 1)http://performancing.com/node/407 2)http://www.urbangiraffe.com/2005/04/12/themeguide1/ 3)http://punkprojekt.com/2006/02/21/wp-design-guide-part-one/ 4)http://paulstamatiou.com/2005/12/31/customizing-k2-part-2/ still more? go to google. […]
Hi, nice tutorial for the newbie. great work buddy.
I have also seen a free template that I liked http://technology.plugai.info/wordpress-themes/
[…] Remember when I said I was going to mosey over to the WordPress forums to look for help on creating themes and templates? Well, I did, and I was referred to this great site called Urban Giraffe. The author created a WordPress theme tutorial which I’ve been following. Although I’m not done with the tutorial (each lesson has mysteriously gotten more and more difficult & time-consuming for me), I’m learning a lot about how to handle some of the idiosyncracies of CSS that I’ve had trouble with, and of course, about the structure of the WordPress themes and templates. […]
[…] I’ve completed part 1, and what you see is what you get. There were a couple of intermediate steps along the way, and I’ll share screen captures of those. […]
[…] ì›Œë“œí”„ë ˆìŠ¤ 테마 ê°€ì´ë“œÂ […]
seems to be a very useful guide for the novice and intermidiate people.. thanks for the info…
[…] 30. ì›Œë“œí”„ë ˆìŠ¤ 테마 ë¶„ì„ […]
I’m using this guide again to create another completly custom wordpress theme. I have had good success simply changing over similiar templates, but sometimes you have to think “outside the box” and use a non-convential structure. Modifying the default and very well built Kubrick theme has worked well for me in the past and I’ll be using this excellent guide to do it again. Thanks for writing it.
Just wanted to thank you for putting in some time on this and doing an excellent job explaining it for us who are new to web coding and WordPress.
[…] Dissection of a WordPress theme […]
[…] WordPress Codex Dissection of a WordPress theme: Part 1 Blank WordPress Theme […]
[…] 第一部分:把模版å„部分分开; 第二部分:页眉和页脚的设计; 第三部分:侧边æ 的设计; 第四部分:内容部分的设计。 […]
[…] UrbanGirrafe.com – Dissection of a WordPress Theme […]
[…] My original theme was Green Marinée template, with a little of experience (from reading the preceding resources) I modify it and added a new features, you`ll know about them when I release the theme for public(very soon)!Oh! I forgot a great resource!!John (the guy who learn you how to run WordPress on Computer) also posted a fantastic guide about how to build a theme from scratch with title “Dissection of a WordPress Theme” which also can be downloaded as PDF file from here! […]
[…] My original theme was Green Marinée template, with a little of experience (from reading the preceding resources) I modify it and added a new features, you`ll know about them when I release the theme for public(very soon)! Oh! I forgot a great resource!! John (the guy who learn you how to run WordPress on Computer) also posted a fantastic guide about how to build a theme from scratch with title “Dissection of a WordPress Theme” which also can be downloaded as PDF file from here! […]
[…] I’m creating the CSS file for this layout from scratch. I’m going through the Dissection of a WordPress theme from UrbanGiraffe. It’s a pretty, frickin good tutorial so far. […]
[…] WordPress temaları nasıl yapılır? Ocak 5, 2007 Etiketler:Wordpress temaları hakkında ne zaman araÅŸtırma yaparsam, ya firefox favori linklerim uçuyor, yada sakladığım dosyaların yerini unutuyorum. Bunun için bir baÅŸlık altında linkleri toplamaya karar verdim. HTML ve CSS ileri düzey bilgi sahibi olduÄŸumuzu varsayarak yola çıkalım:UrbanGiraffe Detaylı anlatımChrisJDavisTextoBir link daha […]
UrbanGiraffe » Dissection of a WordPress theme: Part 1…
…
[…] WordPress Template building tutorial […]
[…] 「Dissection of a WordPress theme: Part 1ã€ã‚’著者㮠John Godley ã‹ã‚‰è¨±å¯ã‚’もらã£ã¦ç¿»è¨³ã—ã¾ã—ãŸã€‚ WordPress ã®ãƒ†ãƒ¼ãƒžã«ã¤ã„ã¦ã®åˆå¿ƒè€…å‘ã‘ã®è§£èª¬ã§ã™ã€‚オリジナル版ã¯ç¾åœ¨ç¬¬ä¸‰ç« (パート3)ã¾ã§å‡ºã¦ã„ã¾ã™ã€‚ […]
quite like the tutorial, it’s a great way to get up to speed on things. The one suggestion I would make is to add links to parts two, three and four from within the Conclusion section.
I’ve been looking forever for something like this, and your tutorial made customizing my wordpress theme so simple… I’m working on changing my entire site over to wordpress and you’ve saved me hours of bashing my computer trying to get things done.
thanks again. =)
I think i messed up. Everytime I go to the dashboard to test the style, it doesn’t show and at the bottom it says that the stylesheet is missing for MonkeyMagic. HELP!! What did I do wrong and how can I fix it.
Thank you so much for this site! I have completed all of the steps (that worked without pulling my hair out) up to the Sidebar an dmy questions are this: (I hope I don’t sound like a dummy :O) I will WRITE IN CAPS THAT WHICH I DON’T UNDERSTAND ok?
The sidebar is contained within the file sidebar.php. If we take a look here we find a lot of code, and we can ignore all but this summary:
… sidebar code …
I’M ASSUMING WE DON’T ERASE EVERYTHING BETWEEN (I DIDN’T)
Everything is cleanly wrapped inside an HTML div section with an ID of ‘sidebar’. This is just what we need, as it means we can change the appearance of the sidebar by simply adding appropriate styles in the CSS file, and without touching a single line of code in sidebar.php.
So, edit style.css and add the following style after the header:
SO DOES THIS MEAN WE GET OUT OF THE SIDEBAR EDIT AND GO TO: STYLE.CSS? mINE DOESN’T HAVE ONE THAT SAYS STYLE. HOWEVER THEIR IS ONE AT THE TOP OF THE LIST THAT SAYS STYLESHEET, iS THIS THE SAME AS “sTYLE” AND WHEN I GO IN THERE I DON’T SEE WHAT YOU MEAN “AFTER THE HEADER” COULD YOU PLEASE ELABORATE? I TRIED PUTTING THE STYLE IN BOTH THE SIDEBAR AS WELL AS THE STYLESHEET, HOWEVER I DIDN’T SEE “THE HEADER PART”
pLEASE DON’T LAUGH AT ME LOL THANK YOU FOR ANY HELP YOU CAN GIVE ME
[…] UrbanGiraffe » Dissection of a WordPress theme: Part 1 […]
[…] Pulir aún más el tema visual. […]
[…] Also Check out the following links which can help you in Designing your own WordPress themes. http://codex.wordpress.org/Theme_Development http://www.cypherhackz.net/archives/2006/12/13/make-your-own-wordpress-theme-part-1/ http://lorelle.wordpress.com/2006/05/25/canvas-wordpress-plugin-build-your-own-wordpress-theme/ http://www.urbangiraffe.com/2005/04/12/themeguide1/ http://www.jeffhendricksondesign.com/create-your-own-wordpress-theme-from-any-css-design-layout/ […]
Just what I was looking for! Thanks!
😀
[…] Dissection of a WordPress theme: Part 1 […]
[…] Theme: Theming […]
[…] Disecting a Word Press Theme […]
craftsman: Did you put the special header at the start of style.css?
Sandy: Yes, edit style.css and leave the sidebar. The header is the bit of writing at the top of the file telling you about the theme. The style shouldn’t go in the sidebar, just style.css
hello. I use wp and I want to make my theme so I read this article.
I think it’s very good article for wp beginner. so I want to translate this lesson for korean wp user. could you agred it? Thanks
Very simple to follow. Great work & thank you!
Hi,
In the step where we edited the styles.css (in the new folder i.e.monkeymagic) I was just left with
/*Theme Name: SuccessDating
Theme URI: SuccessDatingTips.com/
Description: Theme dissection example
Version: 1.0
Author: David Tupes
Author URI: SuccessDatingTips.com/
*/
....
so where do I put the
#sidebar
{
float: right;
width: 190px;
}
???
thanks,
David
The instructions say ‘after the header ‘
But the header was cut out of
style.cssin an earlier step?thanks,
[…] Customize Kubrick ThemeThis is written for an older WordPress installation but the advice is pretty sound anyway. Kubrick (wordpress default theme) is a good place to start for theme customization.Sandbox Theme for WordPress […]
Is it possible to edit the PHP so that the most recent comment is at the top of the list rather than the bottom>
Thanks,
Allen
Heyjin, sure go ahead and translate this into Korean. If you notify me when you’ve finished I’ll make sure to provide a link from here to the translation.
David, put the #sidebar code in that file. Location isn’t important, provided the head section always comes first.
[…] of various parts, such as the loop. (You can read all about the dissection of a WordPress Theme right here.) And although that series was written over two years ago, it accurately describes the gist of how […]
Hi,
First of all, I have to say that this is a great turorial. 🙂 But I think there is some mistake. In deleting the code, don’t you also have to delete this line too –
" type="text/css" media="screen" />?
I didn’t get it the first time, but when I deleted this it became OK.
Thanks anyway!
Sarat
[…] out there. A simple Google search on WordPress themes has got me thinking about trying to customize the blog in keeping with the layout of my website. That involves fiddling around with php code – […]
John, You have written undoubtfully the best wordpress template tutorial. I wish there were similar tutorials on the web for different apps.
Thank You
Sarat: I’m not sure which part you are referring to
Thanks Shinobi!
It worked for me. You have to delete everything between the tags, then, don’t forget to update.
Very useful. Thank you for the guide. I’ve been looking for a simple guide to tweak my WP theme and now I found it.