Translation:
Resources:
Life as a WordPress blogger has become remarkably easy. If you can hold a mouse and follow instructions then you’re most of the way towards carving out your own niche on the internet. A fresh installation gives you a powerful and attractive system with minimal effort, and with a little luck you can be blogging in under half an hour.
Despite the availability of hundreds of themes, and the general goodness of the default Kubrick theme, sometimes you just want to give your blog that personal touch, and the only way to do this is by going under the hood and having a look around.
A month in to running a WordPress-based website and I find myself doing the very same thing. None of the themes were exactly what I was looking for, and after investigating the internals of WordPress I realised it was a lot more involved than it initially appeared. I could certainly imagine a beginner being overwhelmed by the mass of acronyms and incongruent technologies.
With this in mind I decided to write a guide that would help not only myself, but might also help others who have been put off trying to experiment with WordPress. I make no claims of being a style guru and will rely on common sense and basic design principles.
In writing this I will assume a rudimentary knowledge of HTML and CSS. I will attempt to annotate all the important parts. The guide will begin slowly, but should speed up once a level of comfort has been reached.
Rather than starting a theme from scratch, and having to explain everything, I will instead focus on dissecting an existing theme and explaining parts as they are required. From a personal point of view, I find it easier to learn things by focussing on the small details, and ignoring everything else. In this instance I will be using the default WordPress 1.5 theme Kubrick.
Diagrams will be used where necessary, and annotated code will be available. The different stages will be available to download using the links in the menu on the right of each page.
The first part of this guide is split into two steps, and will result in a basic site with a minimum of style – it will be fully usable, if not particularly attractive. Future guides will dissect the theme further, and make it look more attractive.
Step 1: Pulling it apart
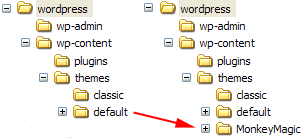
The first step is to make a copy of the default theme. All themes are found in the wp-content/themes directory. Here Ive simply copied the default theme and renamed it to MonkeyMagic:
Cleaning the theme
Now we need to clean the theme in order to make it our own. Every theme has a piece of information that tells WordPress what the theme is called, who wrote it, as well as containing other details such as version and description. This information is displayed by WordPress in the administration presentation section, and a theme will not work without it. The information is defined at the start of the file style.css. Its important that we dont get confused with the existing Kubrick style, so the best thing is to delete the style.css, and create a new one:
/*
Theme Name: MonkeyMagic
Theme URI: http://urbangiraffe.com/
Description: Theme dissection example
Version: 1.0
Author: John Godley
Author URI: http://urbangiraffe.com/
*/
Make sure you save this in the MonkeyMagic theme directory, and not the default one!
Removing Kubrick
Next we need to remove some Kubrick specific styles in the file header.php. Dont worry about the details here, its just necessary we lose all styles.
Delete from line 17 to 48 (inclusive).
<!DOCTYPE html PUBLIC "-//W3C//DTD XHTML 1.0 Transitional//EN" "http://www.w3.org/TR/xhtml1/DTD/xhtml1-transitional.dtd">
<html xmlns="http://www.w3.org/1999/xhtml">
<head profile="http://gmpg.org/xfn/11">
<meta http-equiv="Content-Type" content="<?php bloginfo('html_type'); ?>; charset=<?php bloginfo('charset'); ?>" />
<title><?php bloginfo('name'); ?> <?php if ( is_single() ) { ?> » Blog Archive <?php } ?> <?php wp_title(); ?></title>
<meta name="generator" content="WordPress <?php bloginfo('version'); ?>" /> <!-- leave this for stats -->
<link rel="stylesheet" href="<?php bloginfo('stylesheet_url'); ?>" type="text/css" media="screen" />
<link rel="alternate" type="application/rss+xml" title="RSS 2.0" href="<?php bloginfo('rss2_url'); ?>" />
<link rel="alternate" type="text/xml" title="RSS .92" href="<?php bloginfo('rss_url'); ?>" />
<link rel="alternate" type="application/atom+xml" title="Atom 0.3" href="<?php bloginfo('atom_url'); ?>" />
<link rel="pingback" href="<?php bloginfo('pingback_url'); ?>" />
<style type="text/css" media="screen">
/* BEGIN IMAGE CSS */
/* To accomodate differing install paths of WordPress, images are referred only here,
and not in the wp-layout.css file. If you prefer to use only CSS for colors and what
not, then go right ahead and delete the following lines, and the image files. */
body { background: url("<?php bloginfo('stylesheet_directory'); ?>/images/kubrickbgcolor.jpg"); } <?php /* Checks to see whether it needs a sidebar or not */ if ((! $withcomments) && (! is_single()) && (! is_page())) { ?>
#page { background: url("<?php bloginfo('stylesheet_directory'); ?>/images/kubrickbg.jpg") repeat-y top; border: none; } <?php } else { // No sidebar ?>
#page { background: url("<?php bloginfo('stylesheet_directory'); ?>/images/kubrickbgwide.jpg") repeat-y top; border: none; } <?php } ?>
#header { background: url("<?php bloginfo('stylesheet_directory'); ?>/images/kubrickheader.jpg") no-repeat bottom center; }
#footer { background: url("<?php bloginfo('stylesheet_directory'); ?>/images/kubrickfooter.jpg") no-repeat bottom; border: none;}
/* Because the template is slightly different, size-wise, with images, this needs to be set here
If you don't want to use the template's images, you can also delete the following two lines. */
#header { margin: 0 !important; margin: 0 0 0 1px; padding: 1px; height: 198px; width: 758px; }
#headerimg { margin: 7px 9px 0; height: 192px; width: 740px; }
/* END IMAGE CSS */
/* To ease the insertion of a personal header image, I have done it in such a way,
that you simply drop in an image called 'personalheader.jpg' into your /images/
directory. Dimensions should be at least 760px x 200px. Anything above that will
get cropped off of the image. */
/*
#headerimg { background: url('<?php bloginfo('stylesheet_directory'); ?>/images/personalheader.jpg') no-repeat top;}
*/
</style>
<?php wp_get_archives('type=monthly&format=link'); ?>
<?php wp_head(); ?>
</head>
<body>
<div id="page">
<div id="header">
<div id="headerimg">
<h1><a href="<?php echo get_settings('home'); ?>"><?php bloginfo('name'); ?></a></h1>
<div class="description"><?php bloginfo('description'); ?></div>
</div>
</div>
<hr />
[…] 4:16 am Filed under: WordPress Tags: wordpress, theme, tutorial, howto, article UrbanGiraffe >> Dissection of a WordPress Theme: Part 1 Life […]
This is very useful. Thanks!
JD
[…] ess UrbanGiraffe ha rilasciato la prima parte di una serie di articoli chiamata Sezionamento di un tema per WordPress. Si tratta di una guida comprensiva su come prendere il […]
[…] ode-test UrbanGiraffe » Dissection of a WordPress Theme: Part 1 UrbanGiraffe » Dissection of a WordPress Theme: Part 1 This entry […]
[…] heme Tutorial
This looks like exactly what I’ve been looking for – a step by step dissection of WordPress Themes.
This entry […]
Customizing WordPress Themes: A Guide
I often post some of my experiences in dealing with customizing aspects of WordPress and it’s themes. Kubrick generates a lot of interest as it was ported to be the Default Theme for WordPress 1.5…and 1.5 has become wildly popular. When you first …
[…] heme Filed under: Weblogs, Software — Hal @ 1:36 pm UrbanGiraffe has posted Dissection of a WordPress Theme: Part 1: I decided to write a guide that would help not onl […]
[…] press 1.5 Thematic Nuts and Bolts.”> Over at UrbanGiraffe there is a great article, Dissection of a WordPress Theme: Part 1. I sure wish this had been around just a few short w […]
[…] aquo; Nani Gifts Definitely worth bookmarking I really enjoy the theme guide that Urban Giraffe created. WordPress is amazing and I’d love to see somet […]
[…] utorial on how to dissect the default theme for WordPress and make your own custom theme. It’s only on part one so far, but it’s really well done! I can’t wait for […]
[…] ies – WordPress Templates WordPress Skins WordPress Themes LinkyLoo — Mark Dissection of a WordPress Theme: How did I miss this one? An in dept insight into WordPress 1 […]
[…] p; « Tiger did it. Wordpress Themes. Dissection of a WordPress Theme This entry was posted […]
I’m interested to translate this and future lessons for the WordPress Italy project, let me know if you agree to have them translated.
Thanks
Great! At last someone is explaining in straightforward language how WP is put togther. WP is a great tool but it’s sometimes assumed that all users know more than they do. I’ve spent hours trying to find something like this.
Very much looking forward to the next sections.
[…] í•œë‹¤ê³ ìƒê°í•œë‹¤. ìˆ˜ì • : ì›Œë“œí”„ë ˆìŠ¤ì˜ í…Œë§ˆì— ëŒ€í•œ ìžì„¸í•œ ì„¤ëª…ì€ UrbanGiraffesë‹˜ì˜ ë¸”ë¡œê·¸ì—ì„œ 확ì¸í• 수 있다. 2005ë…„ 4ì›” 13ì¼ […]
This is a great article to help people get started on their own theme.
Keep up the good work!
[…] s Links
{style:phreak;} – colormatch redux: Keywords: color, css, html UrbanGiraffe » Dissection of a WordP […]
[…] i WordPress mÃ¥ste man bekanta sig med “Themes”. En bra introduktion finns hos UrbanGiraffe Självklart är Codex hos WordPress en del. Här finns en intro […]
[…] tes and the “is” Functions WordPress Help from Podz WordPress Reference Centre Urban Giraffe’s Dissection of a WordPress Theme, Part 1 This […]
You can achieve this using just stylesheets, leaving the template files untouched and keeping the content at the top of the HTML (good for accessibility and Google):
#content {

  float: left;

  margin-right:195px;

}

#sidebar {

	float:left;

	width:190px;

	clear:right;

}

#footer, #header {

	clear:both;

	width:100%;

}
Of course, you might want to edit out those tags or switch them off in the CSS:
hr {

 display:none;

}
Excellent disection – this should be added to the WordPress Codex ASAP! Far better than anything in there.
As for my previous comment – I should have finished reading – you deal with the tag better by moving it.
[…] own XHTML Strict them for WordPress. I think this article would be a good place to start. UrbanGiraffe » Dissection of a WordPress Theme: Part 1 This entry w […]
I’ve been digging around for a good guide on changing templates — thank you! I need to modify my WordPress default installation as well as a Mediawiki site I’m in charge of. This will give me a great place to start.
[…] r people’s templates for quite a while and I’m axious to start making my own. wp theme tutorial
[…]
Boy, catching this info would have saved me some major headaches- from slamming my head repeatedly against the wall. I can’t help but add that beginners and non-beginners alike would also be helped tremendously if people commented their template code!
Sorry… just had to get that one off my chest.
[…] Filed under: Personal, Multi-Part, WordPress Tags: multipart, wordpress, theme UrbanGiraffe >> Dissection of a WordPress theme: Part 1 Life […]
[…] UrbanGiraffe has posted some excellent information on the dissection of a WordPress theme: part 1, part 2.
Permalink
[…]
[…] Netlex News Wordpress23 Apr 2005 07:20 pm WordPress Theme : tutorials Dissection of a WordPress Theme: Part 1 urbangiraffe.com Dissection of a WordPress Theme: Pa […]
[…] s een heel mooi concept; naar documentatie zoeken kan wel eens moeilijk lijken doch als je zoiets als dit vindt kun je weer even vooruit.
Posted: April 23, 2005 in: Uncatego […]
[…] s een heel mooi concept; naar documentatie zoeken kan wel eens moeilijk lijken doch als je zoiets als dit vindt kun je weer even vooruit.
Posted: April 22, 2005 in: Uncatego […]
[…] 0:46
· Filed under 電腦相關, Blog_WordPress, Isice0819
Dissection of a WordPr […]
Let the Remodeling Begin
One of the first things I need to do is tweak this site’s theme and today I found just the thing I need, the start of an excellent primer on building WordPress themes….
[…] them quite helpful: UrbanGiraffe has two good posts on WordPress’s theme system: Dissection of a WordPress theme: Part 1 and Dissection of a WordPress theme: Part 2. One of […]
[…] hy not pay the Urban Giraffe a visit. Here are the two articles he has written so far: http://www.urbangiraffe.com/2005/04/12/themeguide1/ http://www.urbangiraffe.com/2005/04/22/t […]
[…]
Dissection of a WordPress Theme
Wednesday 13 April 2005 @ 12:03 pm
Dissection of a WordPress Theme A very detailed description of how the WordPress theme syste […]
[…] ordPress theme. Takes you through a redesign of the default “Kubrick” theme. read more | digg story This entry was posted […]
[…] ction of a WordPress theme: Part 1 Posted by Randy Fisher under Tips n’ Resources UrbanGiraffe » Dissection of a WordPress theme: Part 1 WordPress Guide […]
Shouldn’t the red-background text on page 6, which says “get_header”, say “get_sidebar”?
[…] a>
Posted on
Thursday 28 April 2005
check out UrbanGiraffe’s Dissection of a WordPress theme; it’s an interesting tutorial on […]
[…] ì¼ê¸°? »
UrbanGiraffe » Dissection of a WordPress Theme
UrbanGiraffe » Dissection of a WordPress Theme: Part 1 UrbanGiraffe » Dissection of a WordP […]
Hi, I`m tai.
Thank you for the nice guide! I`m not a beginner, but it is still useful for me and actually I`ve enjoyed your article. I think your guide is very useful for other Japanese WordPress users too, so can I translate it to Japanese and put it on my site (or somewhere like Japanese Codex )?
Ta-Da
I’d been meaning to teach myself enough css, php, and sql to finally use WordPress, a powerful, flexible blogging utility, certainly moreso than Blogger. The process was faster than I had expected, and I’m really pleased with the results and looking…
[…]
UrbanGiraffe continues to expand on its WordPress theme dissection. See parts 1, 2, 3 and 4. These
Permalink
[…]
[…] I just found this guide to doing your Theme from the ground up without too much trouble: Dissection of a WordPress Theme Goodie. You all know what that means. […]
[…] and arranging it on screen. Each part is 7-8 web pages long, so take your time. Links to part 1, part 2, part 3, part 4.
This ent […]
Is there a “printer-friendly” version of these lessons — without the Comments?
Print-friendly version coming very soon – couple of days most likely.
[…] inks, wordpress theme, guide May 24th, 2005 Dissection of a WordPress theme: Part 1 – Pulling it apart Part 2 – Complete design, header, and footer Part 3 – The sidebar P […]
Thank you, thank you, thank you, thank you, thank you, thank you!
Tried to find the trackback link, but must be blind this morning. Anyway, I mentioned your website in this post this morning.
Thank you for all you have done for us WordPress newbies out here.
http://joscafe.com/2005/06/04/saturday-specials-2/
[…] Posted on Monday 6 June 2005 Step by Step Guide Recommand!! http://www.urbangiraffe.com/2005/04/12/themeguide1/ No comments have been added to this post yet. […]
[…] affe.com/”>UrbanGiraffe’s Dissection of a WordPress theme, as I have never worked with […]
[…] ccessfully activated it. Currently reading UrbanGiraffe’s Dissection of a WordPress theme, as I have never worked with Cascading Style Sheets or PHP b […]
Dissection of a WordPress theme: Part 1
Dissection of a WordPr…
[…] í•œë‹¤ê³ ìƒê°í•œë‹¤. ìˆ˜ì • : ì›Œë“œí”„ë ˆìŠ¤ì˜ í…Œë§ˆì— ëŒ€í•œ ìžì„¸í•œ ì„¤ëª…ì€ UrbanGiraffesë‹˜ì˜ ë¸”ë¡œê·¸ì—ì„œ 확ì¸í• 수 있다. […]
[…] ill eventually have 3 columns to it. Here is the site I’ve been using as reference: Urban Giraffe This entry was posted […]
Holy cow!! Following your instructions make designing wordpress themes a whole lot easier now!! Thanks soo much for writing this!
[…] Dissection of a WordPress theme A WordPress tutorial by Urban Giraffe. Dissection of a WordPress theme: Part 1 Pulling it apart Dissection of a WordPress theme […]
I am very happy you wrote these – I would never have figured all of this out myself!
[…] siderne) til at være pæne igen.Jeg var aldrig kommet sÃ¥ langt som jeg trods alt er uden Urban Giraffe. Dette indlæg blev skrevet tirsda […]
[…] s. Donec blandit. Praesent sollicitudin consequat magna. Aenean at quam ac justo porttitor ornare. http://www.urbangiraffe.com/2005/04/12/themeguide1/2/ Nulla facilisi. Ut purus wisi, euismod vitae, pulvinar id, feugiat in, orci. In nulla metus, la […]
hello! thank you for the tutorial, I tried designing my Test wordpress page and there are some lay-out problems. The sidebar is not properly aligned. The footer is not in its proper location as well. And also look at my search at the side bar. thanks, hope you could help me with those small problems. Ü
Hi:
I want to thank you for all this hard work you have done, and it is a great help.
Erick: I had a look at your website and couldn’t see any of the problems you mentioned – did you fix them already?
sxz: That doesn’t sound good! Everything seems to be fine now, so the server must have been having problems earlier. Hopefully it won’t happen again anytime soon.
Please help cant find my title!!! where is it????
whoopsie, found it….
thankyou so much for the color coded stuff
Hi Fuzzit. Yeah, I think you deleted too much from the stylesheet – there are no styles at all! You’ll need to add a style for the sidebar. If you’re not sure if the style is affecting it then the best technique is to give it a background colour so you can see exactly what is happening:
#sidebar

{ background-color: red }
It makes it a lot easier when you can see the dimensions of the box.
ok, really stuck. I can’t get my sidebar moved. I think I deleted to much in the stylesheet, I dunno. Please help.
[…] ahren ilnowas weblog Andreas B webdesign Files.WordPress.de Beccary Da ist eine Menge Info Hier gibts eine Anleitung, wie man Themes macht. Permalink […]
[…]
August 16th, 2005
Ugliness
Woo! I’m following this fantastic guide and making my own theme so there will be ugliness while […]
[…] Wouldn’t it be loverly? August 17th, 2005 – Nice walkthough of WordPress 1.5 themes (though probably not anything you didn’t know a […]