Creating a form in Filled In
The first step to enhancing a form is to create the Filled In form recipient. This is a very simple process, and happens within the Filled In administration interface:

That’s all there is to it. The form name you give here is the one you specify as the ID on the HTML form. To demonstrate further we’ll use a contact form as a simple example.
If we view the post it appears as we would expect, with no indication that anything special has happened. Let’s enter some details.
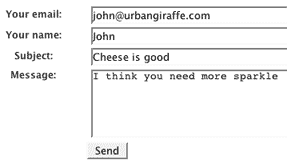
Pressing submit we get the exact same page.
Viewing our data
Something happened, but we’re not sure what. Let’s go back to the Filled In interface and see what it says:
![]()
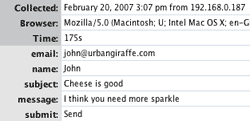
It is telling us that one result has been submitted. Clicking on this we are shown more details:
![]()
Hey, it’s our data! With very little effort not only do we have a fully functioning form but also a data repository. Although useful this is not sufficient for a real website so let’s make it more useful.
The first thing we should do is to edit the ‘contact’ form in Filled In. We do this by clicking on the form name, taking us to an edit page. There’s a fair amount going on here so let’s break it down into two sections: basic and advanced.
Basic Form Details
Every form has a small section of basic details:
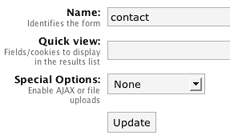
You can see we have the form name, something called ‘quick view’, and some ‘special options’.
What’s the quick view field for? If you recall, when we looked at the results for the form (see ‘Viewing our data’) we saw the date the form was submitted, along with the email, name, and other details. How did Filled In know to show us these details? It didn’t, it simply showed the first four fields in the order they were received. Sometimes this order is not what we want. The quick view field allows us to change what fields are shown on the results page.
Let’s restrict the visible details to just the name and email. You can use any field or cookie name here.
![]()
Note how we specify multiple fields with a comma. When we look at the results for the form we only see the ones we’re interested in.
![]()
If you want to see all details for a particular submission then click on the date:
AJAX and File Uploads
Every form has so-called ‘special options’. This allows you to set whether the form can accept file uploads, whether it supports AJAX submissions, or whether it is just a plain form. Note that you can either have AJAX or file uploads, but not both together (this is a JavaScript security restriction).
When a form has been AJAX enabled it works almost exactly the same, but any data submission happens without a page reload. Regardless of whether AJAX is enabled, a form will always retain the user input throughout the validation process.
If you have file uploads then you must mark a form as requiring file upload support. Without this the uploads will be discarded.
Managing Extensions
All extensions are managed in exactly the same way. An extension is added using a drop-down list of available choices.
![]()
Once an extension has been added it can be enabled or disabled using the power on or off buttons. An extension can be deleted by clicking the red delete button.

If you have more than one extension in a group they can be ordered by a drag-and-drop operation. Extensions will be executed in the order in which they are defined.

When a form is submitted, an error message will be reported to the user if any extension fails (including, for example, if a field is not valid). This error message will give details to the user about what happened and, in the case of a filter error, will allow the user to retry. The error message is placed as the first item inside the form. If this is not an appropriate place you can tell Filled In where to display the error message by including a hidden field:
<input type="hidden" name="filled_in_errors"/>
This field will not be included in submitted data.
Pre-Processing Extensions
Pre-processors allow you to define functions that happen before data enters Filled In. Typically this would be to ignore certain fields (to make sure you only get the data you want), or to ignore certain users
For this example we will ignore the submit button. Everytime a form is submitted, the submit button is also included in the data. Unless you tell Filled In about this it will display this value along with the other (more important) values – we might as well get rid of it. To do this, we add an ‘exclude these fields’ pre-processor. We configure the processor by clicking on it’s name:
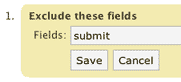
Now when we make a submission we don’t receive the submit button in our data.
Filter Extensions
Filters are one of the most useful aspects of Filled In, allowing you to restrict the data and ensure that it is exactly what you want. Every field in your form can have any number of filters attached to it. In this example we will restrict our ’email’ field to being an email address.
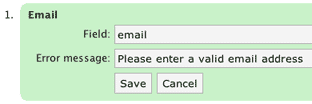
All filters have some configuration options and can be edited by clicking their name. You must define the field that a filter is applied to, and you can also define an optional error message that will be displayed should the data not pass the filter. If an error message is not defined then a default error message is displayed.
Note that certain filters allow you to refer to other fields using a special dollar syntax. That is, if you have a filter ‘Greater Than’, you can specify another field rather than an actual value. This allows you to create special validation whereby one field must be greater than another. The dollar syntax basically consists of wrapping the field name with a dollar symbol:
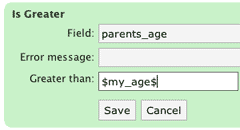
Here we specify that the value of ‘parents_age‘ must be greater than ‘my_age‘.
Note that due to the way that checkboxes and radio buttons are handled by browsers, there is a special filter ‘Checkbox/Radio’ that deals with them.
Post-Processing Extensions
Post-processors are functions that operate on fully validated data. You can have as many post-processors as you want, even of the same type.

Post processors offer the greatest room for expansion, and custom processors could be written to hook validated data directly into external databases and systems.
Most post-processors should be self explanatory, but some require a little more detail.
The Save Uploaded File processor will move file uploads from the default save directory (see Filled In options) to a custom directory. You must specify both the file upload field name and the target directory. All uploads will be given the original filename, and any duplicate names will result in a .1, .2 etc file extension.
Both the WordPress Registration and WordPress Login processors require two field names, and will use the values of these fields to either log the user into WordPress, or to register a new WordPress user. You can use these processors to offer a totally customised login and registration interface.
Result Processing Extensions
Result processors are the last step in a form submission and determine what is returned to the user. Typically this would be something as simple as displaying some kind of thank you message, but you can also redirect the user to another page, re-display the form (already pre-filled with the submitted values), or write a custom extension to do something else entirely.
Email Templates
Filled In has a sophisticated email templating system that allows emails to be sent not only to readers of your site, but also to yourself. The email system operates through the email post-processor and the email templates menu option. First let’s look at templates.
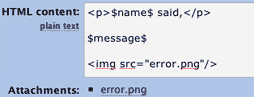
An email template is a pre-defined email with special tags that are replaced with values from a form. You can create as many templates as you wish, and you can use any number of templates in one form. A template must have a unique name, and can contain a ‘from’ address (defaults to the administrator’s email address, if not given), text and HTML content, and also file attachments.
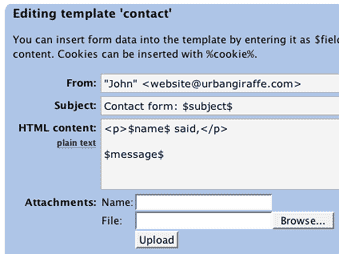
Like with filters, you can use the special dollar syntax to insert data from fields directly into both the email itself, as well as the ‘to’ address, ‘from’ address, and subject. If you specify the name of a file upload field then the file will be attached to the email. You can insert the user’s browser and IP address with ‘$agent$‘ and ‘$remote$‘, and a table of every field with ‘$contents$‘.
Capture cookies can be inserted by wrapping the cookie name with a percent sign. For example, %YourCookie%.
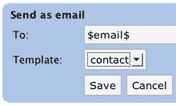
Once you’ve defined a template you can use it in an email post processor. As above, you can also use the dollar syntax to insert values from the form.
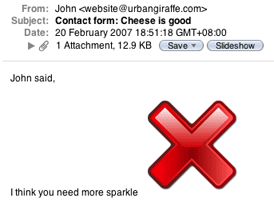
Any image that is attached can be turned into an inline image in the HTML content by simply referring to it by name. For example, if you attach an image ‘error.png‘, you can then refer to this in an img tag and Filled In will automatically insert the image inline with the email (i.e. it will appear in the email itself, rather than just as an attachment).
Will result in an email looking like this:
Any email address can be specified as a simple email address, or in the extended format of:
"Nice Name" <email@email.com>
The extended format allows you to specify a display name so it looks better in a users inbox. You can also specify multiple addresses by separating them with a semi-colon:
Note that you can also configure the default email template by creating a new template called ‘Default’, and changing the text. This will be applied to all emails that use the default template.
Reports
Reports allow you to replay captured data through special post-processors. You would typically do this if you wanted to export all your data to a CSV file, or re-send everything as an email (this would be a very easy mailing list alternative).
Creation of reports works almost the same as with forms: give the report a name and configure some processing steps. A report can be run with the data from any form, and a specific date range can be specified.
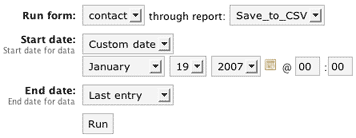
Please ensure that you are fully aware of the consequences of running a report. If you run 10,000 entries through an email processor then you will receive 10,000 emails – both you and your website host may not be happy at such volumes! It also makes little sense to login 10,000 users (WordPress Login processor), but it may make sense to register them (WordPress Registration plugin).
Custom Submit Code
If you mark a form as supporting AJAX then you be automatically provided with a default ‘please wait’ notice. Sometimes this may not be appropriate for your site (for example, the colours may be wrong) and you will want to change it. This can be achieved by specifying your own HTML code in the ‘custom submit code’ at the bottom of every form edit page.
Filled In Options
The Filled In options page allows you to configure some core options.
- Default error CSS – Checking this will tell Filled In to use it’s own built-in stylesheet for error display. Without this checked you will need to specify your own stylesheet
- Track cookies – Here you specify which cookies are captured when a form is submitted
- Attachments directory – Specify the directory where you want attachments to be saved. This directory should typically not be accessible from a browser (for no other reason than to stop people accessing your attachments directly).
- Saved upload directory – Specify the directory where you want file uploads to be stored before they are processed
- SMTP – Specify any SMTP details that your website host may require. Leaving this blank will use your system’s default mail handler. SSL is supported, so you can use this to have emails sent directly from a gmail account.
SDK
You can find details on developing custom processors and filters on the Filled In SDK page.
Hi,
Beautifull script, thank you very much. However, I have a problem once a form is submited. The redirection to a post or an URL does not work. Isc this due to my version of WordPress? 2.3 at the moment.
Another little thing : one form is for wordpress login (on http://www.lescubistes.com/autf). Each time I login, an email is sent automatically. Is it possible to disable this feature ?
Gérald
Gérald, the only reason you would get an email when logging in is if you’ve configured Filled In to do this – check your form details. Redirection works on WP 2.3 so it may also be a configuration problem on your site. If you still cannot get it to work then either raise a bug report with details about your site, or head over to the support forum.
Hi John – I am trying to figure out where the Email Templates are stored after they are created. I can find everything else in the database tables (forms, data, etc.) but I can not find where the email templates are. I have an install of WPMU and I would like to have the same email templates for each blog on my install so I would like to figure out how to recreate the templates each time a new blog is started (or, better yet, have a universal file with the email templates inside).
Hi John,
I tried setting up “filled in” and I think it’s a great and intuitive plugin, but one problems remains: I have set up SMTP settings to an existing postbox and as I understand it, this is only for the outgoing mail. Then I set up two email post processors, one to a fixed address running on my server and another one to the user’s email from the form. Unfortunately, this only works if the uer’s email is also running on my server – with a user’s email like “@gmail.com”, I get “An error occurred while sending an email”.
The SwiftMailer error message is “Expected response code(s) [250] but got response 554”. If this is an SMTP error message, this only means “Transaction failed”. I haven’t found much concerning this error that seemed helpful, except this: http://jerschneid.blogspot.com/2007/04/e-mails-bouncing-back-with-error.html
Might there anything be missing in the mail header, indicating that I’m not faking the sender’s address? I would really appreciate your hel on this.
Thanks in advance
Nik
Hello John,
is the actual form data stored in my server (where exactly) or in yours?
Jordi
All data is stored on your server
John,
I’ve not installed anything yet so cannot comment on how well this plug-in does or doesn’t work, but on paper it’s ‘triffic. This is exactly the plug-in I’ve been looking for – the perfect balance between usability and functionality. So good work (particularly on the documentation).
If an install goes well I’ll be back to thank you again!
Can I use it for login page or sign up page??
I need plugin who support for it…
Yes, it has been used for that