| Download: | Sniplets |
|---|---|
| Version: | 1.4.5 |
| Supports: | WordPress 2.5-2.9.2 |
| Other: | WordPress.org | SVN |
| Support: | This plugin is no longer actively maintained |
Sniplets is a generic text insertion plugin with support for an extensible processing framework. At it’s simplest this means you can dynamically replace text in your posts with text that may be defined elsewhere, or created by some other module. For example, you can use Sniplets to perform syntax highlighting of files, execute custom PHP code, insert data from a database, and perform all manner of other useful tasks within a standard interface. On top of this, Sniplets can be automatically inserted at key points on a page. For example, you can automatically insert text on every RSS post.
- Replace tags in a post with pre-defined text
- Customizable placement points and templates
- Apply processing modules to the pre-defined text to perform additional functionality
- Automatically insert Sniplets in key points of a page (before post, after post, more tag, header, footer, comment form, sidebar, and initialization)
- Apply pre-defined templates to Sniplets
- Includes a Sidebar Widget to allow Sniplets in the sidebar
- Custom modules can be written by the user
- Fully localized
New for version 1.3
Sniplets can now be placed in a variety of places including RSS feeds. This gives you the ability, for example, to add a message at the end of every RSS post.
Note that since version 1.3 Sniplets requires WordPress 2.5 and PHP 5. While every effort is made to retain data from previous versions, there is no guarantee that your data will survive the upgrade process. Sorry.
If you did use custom theme placements then you will need to change your places. Placements configured from the options screen can be found under ‘custom/your place name’.
Installation
The plugin is simple to install:
- Download Sniplets
- Unzip
- Upload the
snipletsdirectory to your/wp-content/pluginsdirectory
You can find full details of installing a plugin on the plugin installation page.
Creating sniplets
Sniplets can be local or shared. A local sniplet is only available to a specific post or page, while a shared sniplet is available across your entire site. Local sniplets are created from a special interface on the edit page:
Shared sniplets are created from the Manage/Sniplets page.
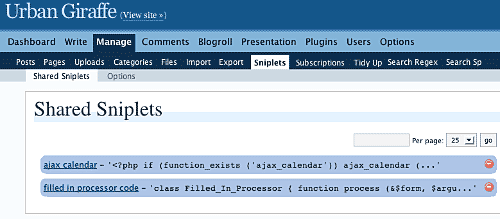
Wherever the sniplet is created it is edited in the same way:
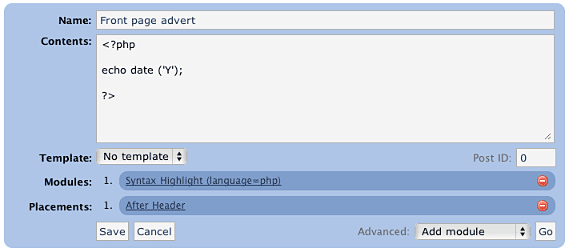
A sniplet has a name, some contents, a template, a number of modules, and a number of placements:
name– used to refer to the sniplet in your post (it may contain spaces and does not need to be unique)contents– can be any text, HTML, PHP, or whatever data you want to pass through any functionstemplate– determines if a pre-defined style is to be usedmodules– small modules that perform a specific function on the content of the sniplet. For example, one function may syntax highlight PHP code.placements– determines where on the page the sniplet will appear. Multiple placements are allowed, and a sniplet can always be manually placed in a post.
Modules
Sniplets takes the idea of text replacement one step further by allowing you to attach special processing modules to a piece of text. Multiple modules can be attached and are ‘executed’ in order. The first module takes some text, processes it, and passes it on to the next module. In this way it is possible to chain functions together and create a highly customized sniplet.
Modules can also accept parameters that change how the function works. Parameters are comma-separated, and are specific to the module:
![]()
Note how a parameter is defined by a name (language), an equals, and a value (php). If no equals is supplied then the parameter is assumed to be ‘true‘.
Adding sniplets into a post
Sniplets are inserted into posts by using a special tagging syntax:
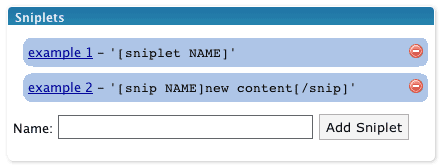
[sniplet NAME]
That’s it! The name must match either to a local or shared sniplet, including any spaces. The Sniplets plugin will replace this tag with the results of running all functions on the sniplet contents.
If you configure Sniplets to do so, you can also use an additional tag to change the contents of a Sniplet from inside your post:
[snip NAME]new content[/snip]
This is basically the same as before but this time the contents of the sniplet are overridden by whatever is inside the start and end tag.
Placements
Sniplets can be automatically inserted into key points of a page by assigning placement points. For example, adding a placement point ‘comment form‘ to a sniplet will automatically insert that sniplet into the comments form area. The following areas are pre-defined:
- Header – appear in the theme header
- Footer – appear in the theme footer
- Before post – appear at the start of a post (first page or all pages)
- After post – appear at the end of a post (last page or all pages)
- More tag – appear where the more tag is defined
- Comment form – appear where the comment form is
- Initialization – appear before anything else on the page (useful for running custom code to insert cookies)
As part of version 1.3, these areas can now refined to specified pages of your website. For example, RSS feeds, posts, archives, and home page. Not all places are available for given page (for example, there are no comments on RSS feeds).
Additionally you can define your own placement points from within your theme or from the Sniplets options page. Custom placement points can then be inserted into your theme using template tags. To do this you need to use the special WordPress filter sniplet_places. You can hook into this from the functions.php file in the theme:
<?php

add_filter ('sniplet_places', 'my_theme_places');

function my_theme_places ()
{
  return array
  (
    'My Theme Name' => array
    (
      'mytheme/myspecialplace' => 'Before the Sidebar',
      'mytheme/myotherplace'   => 'After the Sidebar'
    )
  )
}

?>
Note how the points are defined as an array mapping from a unique ID to a description string. Since version 1.3 you must prefix all places with an identifier for your theme.
Alternatively you can define placements from the Sniplets options page. Here you can only specify the unique ID without description.
Limits
Sometimes you may want to limit the number of Sniplets that appear in a particular placement. For example, you have a message area at the top of your posts, but you only want a maximum of two messages to appear. You can achieve this using limits.
Limits are configured per placement area from the Sniplets option screen. Each placement has an input field where you can specify the maximum number of Sniplets allowed to appear there. A value of 0 means there is no limit. In addition to specifying the maximum limit you can also randomize a placement. This has the effect of displaying Sniplets in that placement in a random order. For example, you limit the placement ‘message’ to three, set the randomise option, and then create five Sniplets for that placement – the plugin will randomly select three of the Sniplets each time the page is viewed.
Templates
Templates are simple wrapping styles that are applied to the output of a Sniplet. Some templates are provided as default and they can be extended from the Sniplets options page:
- Inset – wrap the content in a
divwith classinset - Warning – wrap the content in a
divwith classwarning - Notice – wrap the content in a
divwith classnotice
Templates are defined in the sniplets/view/sniplets directory. If you add a new template to the Sniplets option page then you need to add a corresponding template file.
Bundled functions
The processing functions included with Sniplets are:
- Syntax highlighting (using GeSHi) – this will syntax highlight text from a variety of sources, including PHP, HTML, CSS, and JavaScript, using the GeSHi source highlighter
- Execute as PHP – executes the contents as though it was PHP code
- Include file or URL – treats the contents as a filename or URL and retrieves the contents of that file/URL
- User is logged in/out – returns an empty peice of text is the user is not logged in or out
- Random line – randomly selects a line from the contents
- Ramdom word – randomly selects a word from the contents
- Reverse – reverse the contents
- wpautop – apply WordPress auto-formatting to the contents
- HTML Encode – HTML encode the contents
Full documentation on modules can be found on the Sniplet modules page.
Execute PHP
The Sniplets plugin has an additional replacement mode that will execute and replace any PHP code in a post. This mode must be enabled from the Sniplets options page as it represents a security risk if you do not trust your editors.
For example, with the mode enable you can directly enter this into a post:
Today is the year <?php echo date ('Y'); ?>, and it's very lovely.
Security Concerns
Some of the modules open a big door into your website and could give someone the ability to cause a lot of mischief. The Sniplet plugin allows anyone to insert a Sniplet tag in a post, but only an administrator can create a Sniplet. This should be sufficient for you to restrict what an untrusted user can do. If you need further restrictions then you may want to consider deleting some of the modules. This can be done simply by deleting the appropriate file in the ‘sniplets/modules‘ directory.
Creating your own module
Creating a custom module is simple (provided you know PHP!):
- Create file in
wp-content/plugins/sniplets/modules - Write code to process the
$textvariable - Output any results to the screen (i.e. use
echo) - Include a special header at the start of the file so Sniplets will know it is a module:
<?php
/*
Name: Name of your module, as appears in the drop-down box
*/
?>
Template Tags
You can also insert a Sniplet directly in a theme template file by including the function:
<?php the_sniplet ('name'); ?>
You can insert a placement point by including the function:
<?php the_sniplet_place ('place'); ?>
This will insert the contents of all Sniplets that have the same placement.
Alternatively you can insert Sniplets and placements using WordPress ‘actions’:
<?php

do_action ('the_sniplet_place', 'mytheme/yourplace');
do_action ('the_sniplet', 'sniplet name');

?>
This has the advantage that should the Sniplets plugin not be active then the theme will not show any errors.
Support & Bugs
Support and feature requests should be made through the Sniplets support forum. You can contact me directly but I spend a very limited amount of time on direct support and you stand a better chance of being answered through the forum.
If you find the plugin useful then please do consider making a donation – it is appreciated and helps towards the maintenance of the plugin.
Thanks!
This plugin is no longer actively maintained