| Download: | Sniplets |
|---|---|
| Version: | 1.4.5 |
| Supports: | WordPress 2.5-2.9.2 |
| Other: | WordPress.org | SVN |
| Support: | This plugin is no longer actively maintained |
Sniplets is a generic text insertion plugin with support for an extensible processing framework. At it’s simplest this means you can dynamically replace text in your posts with text that may be defined elsewhere, or created by some other module. For example, you can use Sniplets to perform syntax highlighting of files, execute custom PHP code, insert data from a database, and perform all manner of other useful tasks within a standard interface. On top of this, Sniplets can be automatically inserted at key points on a page. For example, you can automatically insert text on every RSS post.
- Replace tags in a post with pre-defined text
- Customizable placement points and templates
- Apply processing modules to the pre-defined text to perform additional functionality
- Automatically insert Sniplets in key points of a page (before post, after post, more tag, header, footer, comment form, sidebar, and initialization)
- Apply pre-defined templates to Sniplets
- Includes a Sidebar Widget to allow Sniplets in the sidebar
- Custom modules can be written by the user
- Fully localized
New for version 1.3
Sniplets can now be placed in a variety of places including RSS feeds. This gives you the ability, for example, to add a message at the end of every RSS post.
Note that since version 1.3 Sniplets requires WordPress 2.5 and PHP 5. While every effort is made to retain data from previous versions, there is no guarantee that your data will survive the upgrade process. Sorry.
If you did use custom theme placements then you will need to change your places. Placements configured from the options screen can be found under ‘custom/your place name’.
Installation
The plugin is simple to install:
- Download Sniplets
- Unzip
- Upload the
snipletsdirectory to your/wp-content/pluginsdirectory
You can find full details of installing a plugin on the plugin installation page.
Creating sniplets
Sniplets can be local or shared. A local sniplet is only available to a specific post or page, while a shared sniplet is available across your entire site. Local sniplets are created from a special interface on the edit page:
Shared sniplets are created from the Manage/Sniplets page.
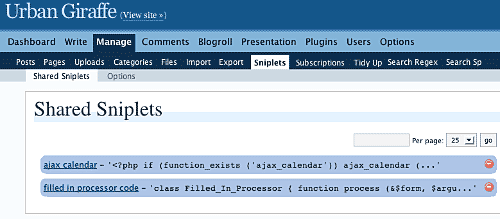
Wherever the sniplet is created it is edited in the same way:
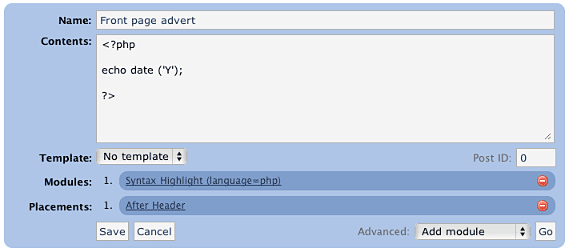
A sniplet has a name, some contents, a template, a number of modules, and a number of placements:
name– used to refer to the sniplet in your post (it may contain spaces and does not need to be unique)contents– can be any text, HTML, PHP, or whatever data you want to pass through any functionstemplate– determines if a pre-defined style is to be usedmodules– small modules that perform a specific function on the content of the sniplet. For example, one function may syntax highlight PHP code.placements– determines where on the page the sniplet will appear. Multiple placements are allowed, and a sniplet can always be manually placed in a post.
Modules
Sniplets takes the idea of text replacement one step further by allowing you to attach special processing modules to a piece of text. Multiple modules can be attached and are ‘executed’ in order. The first module takes some text, processes it, and passes it on to the next module. In this way it is possible to chain functions together and create a highly customized sniplet.
Modules can also accept parameters that change how the function works. Parameters are comma-separated, and are specific to the module:
![]()
Note how a parameter is defined by a name (language), an equals, and a value (php). If no equals is supplied then the parameter is assumed to be ‘true‘.
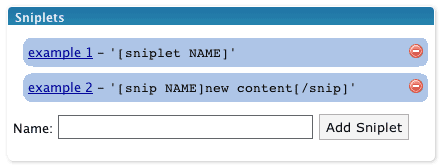
Adding sniplets into a post
Sniplets are inserted into posts by using a special tagging syntax:
[sniplet NAME]
That’s it! The name must match either to a local or shared sniplet, including any spaces. The Sniplets plugin will replace this tag with the results of running all functions on the sniplet contents.
If you configure Sniplets to do so, you can also use an additional tag to change the contents of a Sniplet from inside your post:
[snip NAME]new content[/snip]
This is basically the same as before but this time the contents of the sniplet are overridden by whatever is inside the start and end tag.
Placements
Sniplets can be automatically inserted into key points of a page by assigning placement points. For example, adding a placement point ‘comment form‘ to a sniplet will automatically insert that sniplet into the comments form area. The following areas are pre-defined:
- Header – appear in the theme header
- Footer – appear in the theme footer
- Before post – appear at the start of a post (first page or all pages)
- After post – appear at the end of a post (last page or all pages)
- More tag – appear where the more tag is defined
- Comment form – appear where the comment form is
- Initialization – appear before anything else on the page (useful for running custom code to insert cookies)
As part of version 1.3, these areas can now refined to specified pages of your website. For example, RSS feeds, posts, archives, and home page. Not all places are available for given page (for example, there are no comments on RSS feeds).
Additionally you can define your own placement points from within your theme or from the Sniplets options page. Custom placement points can then be inserted into your theme using template tags. To do this you need to use the special WordPress filter sniplet_places. You can hook into this from the functions.php file in the theme:
<?php

add_filter ('sniplet_places', 'my_theme_places');

function my_theme_places ()
{
  return array
  (
    'My Theme Name' => array
    (
      'mytheme/myspecialplace' => 'Before the Sidebar',
      'mytheme/myotherplace'   => 'After the Sidebar'
    )
  )
}

?>
Note how the points are defined as an array mapping from a unique ID to a description string. Since version 1.3 you must prefix all places with an identifier for your theme.
Alternatively you can define placements from the Sniplets options page. Here you can only specify the unique ID without description.
Limits
Sometimes you may want to limit the number of Sniplets that appear in a particular placement. For example, you have a message area at the top of your posts, but you only want a maximum of two messages to appear. You can achieve this using limits.
Limits are configured per placement area from the Sniplets option screen. Each placement has an input field where you can specify the maximum number of Sniplets allowed to appear there. A value of 0 means there is no limit. In addition to specifying the maximum limit you can also randomize a placement. This has the effect of displaying Sniplets in that placement in a random order. For example, you limit the placement ‘message’ to three, set the randomise option, and then create five Sniplets for that placement – the plugin will randomly select three of the Sniplets each time the page is viewed.
Templates
Templates are simple wrapping styles that are applied to the output of a Sniplet. Some templates are provided as default and they can be extended from the Sniplets options page:
- Inset – wrap the content in a
divwith classinset - Warning – wrap the content in a
divwith classwarning - Notice – wrap the content in a
divwith classnotice
Templates are defined in the sniplets/view/sniplets directory. If you add a new template to the Sniplets option page then you need to add a corresponding template file.
Bundled functions
The processing functions included with Sniplets are:
- Syntax highlighting (using GeSHi) – this will syntax highlight text from a variety of sources, including PHP, HTML, CSS, and JavaScript, using the GeSHi source highlighter
- Execute as PHP – executes the contents as though it was PHP code
- Include file or URL – treats the contents as a filename or URL and retrieves the contents of that file/URL
- User is logged in/out – returns an empty peice of text is the user is not logged in or out
- Random line – randomly selects a line from the contents
- Ramdom word – randomly selects a word from the contents
- Reverse – reverse the contents
- wpautop – apply WordPress auto-formatting to the contents
- HTML Encode – HTML encode the contents
Full documentation on modules can be found on the Sniplet modules page.
Execute PHP
The Sniplets plugin has an additional replacement mode that will execute and replace any PHP code in a post. This mode must be enabled from the Sniplets options page as it represents a security risk if you do not trust your editors.
For example, with the mode enable you can directly enter this into a post:
Today is the year <?php echo date ('Y'); ?>, and it's very lovely.
Security Concerns
Some of the modules open a big door into your website and could give someone the ability to cause a lot of mischief. The Sniplet plugin allows anyone to insert a Sniplet tag in a post, but only an administrator can create a Sniplet. This should be sufficient for you to restrict what an untrusted user can do. If you need further restrictions then you may want to consider deleting some of the modules. This can be done simply by deleting the appropriate file in the ‘sniplets/modules‘ directory.
Creating your own module
Creating a custom module is simple (provided you know PHP!):
- Create file in
wp-content/plugins/sniplets/modules - Write code to process the
$textvariable - Output any results to the screen (i.e. use
echo) - Include a special header at the start of the file so Sniplets will know it is a module:
<?php
/*
Name: Name of your module, as appears in the drop-down box
*/
?>
Template Tags
You can also insert a Sniplet directly in a theme template file by including the function:
<?php the_sniplet ('name'); ?>
You can insert a placement point by including the function:
<?php the_sniplet_place ('place'); ?>
This will insert the contents of all Sniplets that have the same placement.
Alternatively you can insert Sniplets and placements using WordPress ‘actions’:
<?php

do_action ('the_sniplet_place', 'mytheme/yourplace');
do_action ('the_sniplet', 'sniplet name');

?>
This has the advantage that should the Sniplets plugin not be active then the theme will not show any errors.
Support & Bugs
Support and feature requests should be made through the Sniplets support forum. You can contact me directly but I spend a very limited amount of time on direct support and you stand a better chance of being answered through the forum.
If you find the plugin useful then please do consider making a donation – it is appreciated and helps towards the maintenance of the plugin.
Thanks!
This plugin is no longer actively maintained
Hi,
Great plugin, but I can’t get it to work on wordpress 2.5. Any idea what is going on? Does somebody has a workaround?
Johan
Hi,
When are you coming out with a new version of this plugin?
In WP2.5.1 I can create new sniplets within individual posts. Still not working in ‘shared’ mode.
Hi,
I had a randomized module in sniplets on my page, who doesn´t work now when i upgraded to WordPress 2.5.1.
Have you a new version soon or could you tell me how i should do to get it working again
Otherwise it’s a great plugin
/Ricard
I’m looking for a “really” simple way to add an html entitie to a page or post at the cursor insertion point. Ideally, there would be a combination hot-key assignment.
In other words, I’d like to be able to press shift-` to insert the html entity “ʻ”
Figuring out how to handle this in WordPress without it being rewritten is my second goal. For now, I just want an easy way to insert the character easily.
Anyone aware of any plugin that will do this? Any help is greatly appreciated.
Just a quick note to people with WP2.5/WP2.5.1 who are having issues with the plugin not working. I had the same problem BUT have found out how to get it working. Simply disable javascript prior to going to the manage page and setting everything up – then save and come out. Sorted, it works without any issues.
Hope this helps. 🙂
A new version will be released very shortly.
Brent, I don’t know of a plugin that will do that.
This quick hack seems to make the system functional again on 2.5.1:
Change line 22 of view/admin/sniplets.php from:
<form action=”” method=”post” onsubmit=”return add_page_sniplet(0);”>
to:
<form action=”” method=”post”>
I can’t vouch for any disabled functionality that removing the add_page_sniplet might cause, but it seems to work without having to disable javascript.
Hi John,
Sniplets is looking excellent although I’ve spotted a slight issue in version 1.3.1. There’s no export.php file in the /sniplets/view/admin/ folder. Also, there’s something wrong with the “limits” subpage – getting issues here.
Have emailed you details (since the tracker doesn’t seem to be working).
Would be cool to have this fixed soon as that bug really messes up pages.
Cheers,
Zain
I am created a sniplet with php code. The problem is that I need to include my code in a single line, if I use several lines PHP code is no executed. For example:
+ Fine execution
+ Wrong execution
Outputs the following:
echo ‘Hello world’;
?>
Please, any idea?
I’m not sure what the code was but Sniplets definitely does execute more than one line of PHP. If you want to raise a bug then you can put the code that you are having trouble with there.
Thanks, this is exactly what i was looking for.
Hi John,
As I have some problems to register on the forum, I post my problem here.
I made a fresh install of WP 2.6 with only the sniplet plugn activated. The theme is the default one.
When I create a sniplet and put it in a post, the sniplet displays well when I am on the post page but does not display when I am on the homepage.
Template tags don’t work more on the homepage where as it displays well on the post page.
I use PHP > 5.0
It’s odd that other users don’t have this problem… (and I tested on three wordpress installs)
Jooj, in previous versions of Sniplets nothing was displayed on the home page – this was on purpose. In the latest version I’ve added the ability to put a sniplet of the home page, but this is something you need to enable using the placements function
I’m having trouble getting any sniplet widget to display in the archive.php page. It displays fine on all other pages. I put the same code in a text widget and it displayed fine. Am I missing something?
[…] More … […]
Hello. A very cool plugin, but i have also the same problem of executing more than one line of php code. I have the following sniplet:
and use the 2.6 wordpress.
..and the source code i get looks like:
<?php</p>
<p>echo date(Y);</p>
<p>?>
This happens when you enter the code in the “visual editor” of WordPress. You have to do it in clean HTML.
Hi,
First of all, thanks for the work you put into this plugin. I am curious about one thing, and it could be that I am not doing this properly or overlooked the instructions for it.
I want to put a sniplet in a page and I want the sniplet to execute a php script. This seems like a pretty simple thing to do.
My problem is that the php isn’t being executed. I also tried making a module, but I couldn’t see any modules anywhere, let alone add one to my page.
I am using PHP version 5.2.6, MySQL version 5.0.16, and WordPress version 2.6.
Thanks!
Bryan.
Great work,
I have been searching for a plugin such as this one for a while now.
Am using it in conjunction with some of the plugin from Rob Marsh (Similar Posts etc…).
Thanks a mil,
R
Bryan, it is a simple thing to do and was the original reason for this plugin. If you want to execute PHP then you need to add a module to the sniplet and set it as ‘execute as PHP’
This sniplets plugin and all your other plugins are too awesome. I definitely will use those plugins. Hope to learn more from you.
I love it… Good work!
Hi there John,
just wondering about the sniplet custom placements bug that where in the bug tracker just a while ago and that I’m still experiencing. Have you had a look at it? Is it only me that is having problems with sniplet places defined the “new” way in the functions.php and then not working when I assign that place to a sniplet (sniplet not found)?
Best wishes and keep up that fantastic work. Still think that sniplets is one of the most awesome WP plugins out there.
/Jonas
As far as I’m aware the problem was resolved or explained (see here
Is my interpretation right, that the_sniplet() function allows you to display a sniplet anywhere you want in a theme template? I was the one that posted the bug in the issue tracker mentioned by Jonas and it’s still not working for me. In the issue discussion people started talking about custom placements, but I’m not custom using placements. I simply select “Manual” when I create the sniplet, then call it using the_sniplet() in my theme. But nothing shows up and this used to work.
Hey man, can you tell me exactly how to add the sniplet into my post?
Amar, see the section above titled ‘Adding sniplets into a post’
Philip, I only looked at placements before so I’ll look into the_sniplet function
Philip, I’ve tried using the_sniplet at it worked perfectly. You’ll need to provide more details about your sniplet and how you are calling the function in your theme.
Hi John, thanks for replying. I’ve detailed how I’m using Sniplets in your Support forum. I think I also found out why the sniplet isn’t showing.
In WordPress MU (I did not try in WordPress), sniplets do not show in “Latest posts” (Home) page, only in the Post page itself.
Syntax highlighter has ugly “feature”. For example, if you want it to highlight a PHP language, it is not sufficient to specify language=php as parameter – you must include braces in a code.
And – another thing: I was never sure if Sniplet was active (The green-red button). Just add a tooltip to the button with: “Sniplet is active. Click here to deactivate it”, or something like that. I know, there is fade (gray) effect on whole snipet line, but I was never sure.
Sniplets has not been tested with WPMU and is not designed to work with it.
It seems this plugin has bug when executing php code within documents. It can execute only oneliners, meaning iw whole php code is in ine line. If phpcode spreads toseveral lines it is not executed properly.
I tried this on plain WordPress 2.6.2 with classic template
Sniplets works just fine with multi-line PHP code. Remember that PHP code must be wrapped in <?php and ?>
Well, of course I use php delimiters for code. I tested it. When are at the same line it is parsed correclty, but if it is split to more than one line, that part of code is displayed as text.
I’ve also tested it, and I can’t reproduce any problems with multi-line PHP. As with any problem, please provide full details of the issue including your server environment, version of WP, and the code you are trying to insert. Without this there is little I can do. Please also try to detail problems either in the support forum or in the bug tracker so that this page does not become full of code.
What a fantastic plugin! Thanks!
Howdy,
I’m trying out the sniplet plugin and can’t seem to get the ‘include file or URL’ module to work at all. I try a fully qualified pathname such as c:\somewhere\other\wp-content\plugins\sniplets\readme.txt and it always returns an error. Always ‘file does not exist’.
I place this pathname in the ‘content’ box right? Tried it in the ‘parameter’ box also but doesn’t work there either. All I want to do is include a chunk of html into a post. I must be doing something wrong. I’ve tried this in shared and post specific sniplets and neither works.
Sniplets 1.3.8, WPMU 2.6.2
Any help?
Burt
Hi John, first of all thank you for a great plugin.
I am experiencing the same issue as Pedja, where multi-line php code within a sniplet are not executed. I’m running WP 2.6.3 with default templates.
Viil, you will need to send me the code you are trying to insert because I cannot reproduce this problem at all.
Burt, Sniplets was never designed to work with WPMU and I cannot say whether this will cause a problem or not
John – I am in the same boat as Burt. I cannot get the include module to work. I am using regular wp, not wpmu.
Burt – a work around that I am using is change module to Exec-PHP and then use:
This is working for me, but would still like to get the include module to work. I can get it to grab a url from another site, but can’t do a local file.
John – what should the path be to get it to work? Thanks, other than this issue its work great for me. Great plugin.
sorry, last time. put this inside php block:
include ‘file-to-include.php’;
Will a sniplet that I put in a post also be rendered in the RSS feed for that post? What I am finding is that when I create a sniplet to be executed as PHP, is not executed as PHP in the feed. Is this expected behaviour or am I doing something wrong?
Hi John,
you have an ugly typo on your page.
do_action ('the_snipet', 'sniplet name');is missing ‘l’, so the correct is
do_action ('the_sniplet', 'sniplet name');Can I also add javascript to a page with this plugin?
I don’t get it. I don’t see where I can select a module anywhere. There is only the ‘Placement’ and ‘Template’ option for new sniplet.
I want insert a file as highlighted source code.
Peter, I’ll try to make my typos a little more attractive next time.
Matthias, yes you can.
Arnold, look at the advanced section in the bottom right of each sniplet.
Seeing the same problem as “Arnold”, there is no “Advanced” selection box being displayed. I’ve just installed WP and Sniplets today, so is this perhaps a WP 2.7 incompatibility problem?
Can you send a screenshot? There should be no reason why an advanced box doesnt appear.
If it would only work, but it wont let me create a sniplet. the “add” buttons dont work at all.
Hi John,
Great plugin! Thanks!
However….I’m having the same problem as Pedia and Viil. Multi-line php is rendered as text.
For example,
<?php echo “Hello again!”; ?>
renders correctly, whereas
<?php
echo “Hello again!”;
?>
renders as text, except for the initial php declaration.
Any ideas? Thanks,
Brad
(wp2.7, atahualpa 3.1.7, LAMP)
I still can’t reproduce this problem – I enter multiline PHP and it runs as expected. Maybe you can send me a login to your site with details of where to find the sniplet and I can see if I can find anything?
You need to make sure that the Sniplet has the ‘Execute as PHP’ module enabled.
I’m having the same problem as Brad in #97746. For multiline PHP, the initial PHP declaration is suppressed and what does get shown is the code itself instead of executing. For a single line of PHP, like your example, it works great. I would be glad to provide you with a login and further details – you have my email address from this post.
By the way, I’m on Sniplet 1.4, WP 2.7 Coltrane, running two blogs. The problem occurs on both blogs (and both blogs are on the same server, if that’s a clue).
hi john, i’m have problem with your plugin
Incompatible archive: PCLZIP_ERR_BAD_FORMAT (-10) : Unable to find End of Central Dir Record signature
Installation Failed
can you help me? please
Check your zip software or try re-downloading – the download seem fine here.
Currently running WP2.7 and WP2.7.1 and the Limit and Random settings just aren’t working for me. Placement is OK but every snippet in the relevant position is being displayed without limit
http://urbangiraffe.com/tracker/issues/show/439
Update:- Random IS now working in 1.4.3 but the number limit is not – all snippets still show. I’m using the Revolution template if that has any relevance at all.
Great plugin! One small request / clarification. Can we define parameters in the sniplet? For example,
[sniplet MYSNIP parm=value]
where the parm is used in the contents or modules?
This feature will help create parametric sniplets!
There is actually a way to do this but it seems I haven’t documented it! You may find some details further back in the comments
John: Looks like a great plug-in. I have the perfect use for it to insert Byron Bennett’s Supple Forms – A WordPress CMS Plugin [supple snip=’address_box’] short codes into my WP.
But alas, I received this error installing today’s 1.4.3 build. I attempted to install on two totally different WP 2.7.1 instances. I first tried uploading the sniplets folder by FTP and it bombed on activation. Same result installing from within WP pulling from WP.org plugin repository.
The error is pretty specific. However, I am running 42 plug-ins.
Cheers,
Boots
Plugin could not be activated because it triggered a fatal error.
Parse error: syntax error, unexpected T_CONSTANT_ENCAPSED_STRING in /home/bozo/public_html/clown/wp-content/plugins/sniplets/model/sniplets_class.php on line 382
I have exactly the same problem.
Same error here at two different WP installations.
Follow-up…
John: Build 1.4 dated 1/1/09 installed just fine.
Boots.
Is it possible to create a sniplet that uses the text inside a sniplet tag as argument to e.g. a link?
Example:
Replace the following to a link [snip gc]GC15P2Q[/snip]
Result:
Replace the following to a link http://www.geocaching.com/seek/cache_details.aspx?wp=GC15P2Q
/Mogens
Sure, see ‘Adding sniplets into a post’
I did, but it doesn’t give an example of a sniplet definition that allows text replacement.
I’m looking for what to write in the sniplet definition, so it allows “whatever I’m looking for” to be replaced with eg. GC15P2Q in my example. I’m looking for how to white “replaceme” in http://www.geocaching.com/seek/cache_details.aspx?wp=replaceme
Best Regards
Mogens Beltoft
I get the following error with WP 2.70 on only one of my servers when I import sniplets from a basic backup on a different site.
Fatal error: Call to undefined function: simplexml_load_file() in /homepages/x/y/htdocs/wp-content/plugins/sniplets/sniplets.php on line 339
Sniplets 1.4.3
As the error states, the server does not support loading XML.
Fantastic pluging!
However, I have two small problems with it. This first is that on IE7, I got a javascript error when I try to edit the Placement(s) of a global snippet. I’ve retraced this error to an erroneous comma at the end of the line #16 of the file “placement_edit.php”. This comma must be removed for the jQuery to work properly.
The second problem is more important: like many people who have posted about it in previous posts, I’m unable to execute inline PHP code when they span more than a single line. First example, with the following snippet, only the first and last statements will get executed properly:
1:
2:
3:
The result of this will be:
1: 2009
2: echo date (‘Y’);
?>
3: 2009
Notice that for the second statement, the “<?php” has been removed and the rest of the PHP statement displayed without any execution. This is on WinXP, IIS 5.1 running PHP 5.2.9 in FastCGI mode.
Best Regards,
Sylvain Lafontaine
Oups!, here’s a second try for the PHP code where I have put a space between the < and the ? so that it can show up here:
1:
2:
3:
Thanks,
Sylvain Lafontaine
Maybe the third time will be a charm:
1: <?php echo date (‘Y’); ?>
2: <?php
echo date (‘Y’);
?>
3: <?php echo date (‘Y’); ?>
Thanks again,
Sylvain Lafontaine
what a wickedly cool plugin.
you have made me very happy, and my blog just that lil bit more modx-ey.
John, you’re a good man.
🙂
Greatest plugin since the hallowed Bread-Slicer plugin!
I think this may be what I’m looking for, but I wanted to ask specifically. What I would like to do is post unique keyword focused rss feeds to multiple pages (not posts- at least not yet..) within my WP site. I want the resulting text to be “spider readable” for rss purposes. Am I in the right place?
Thanks!
Tom
I meant to say “for SEO purposes”…
Hi John,
Bit of a strange one, maybe…
Sniplets threw an error after I added xcache to my php.ini and rebooted my nginx web svr …
Fatal error: Allowed memory size of 50331648 bytes exhausted (tried to allocate 40961 bytes) in /home/public_html/guvnr.com/public/wp-content/plugins/sniplets/sniplets.php on line 535
I upped my memory limit to 64k, both in the ini and wp-settings.php but that cut no mustard.
I want to use both your plugin and xcache. Have to use xcache, not least cos I’m writing a tutorial about setting up a vps with nginx/wordpress/xcache/this/that and … well, I just want to get it working! Want to use Sniplets cos it’s just so darn handy.
Any ideas. Maybe you need some more info? Lemme know and I’ll expand.
PS … remember I had that problem with the More text in HeadSpace? My theme is very custom … I rejigged it and now the mod works a treat. And hey, I got my first 4/10 pagerank just today, and don’t think that would have been so do-able with All In One, which i swapped from at Joost’s suggestion.
Truth is, I owe you a donation. When my traffic grows a but more and I’m less in the red, hey, I promise you are my first $recipient 🙂
Bit cheers for your work … really appreciated.
best plugin ever. tks a lot for the great job. URBAN GIRAFFE ROXS!!!!!
I really love this plugin – easy and flexible way, to extend the blog
Why is the Version 1.4.4 only released on wordpress.org?
Is there any changelog for this new Version?
I’m dancing around a solution, but pulling my hair out.
I want to put html with a sniplet into a custom field and call it up to execute. It will be best if I could do it with a template, but can also do it with a sniplet as my post.
i.e. I want to be able to change a whole lot of posts all at once. I envision this as a CMS. for example, I could set up a recipie site where the custom fields were html chunks that would pull up in a template. I’ve gotten that to work already. What I can’t do is make a sniplet work from within that code. I want to be able to put sniplets in the html there and have them execute–perhaps an advertisement that would show in several recipies.
Sorry if this is a duplicate. I tried to post last night but don’t see the comment now.
Regards,
Jeff
I guess you could create a Sniplet that pulls data from the custom field and displays it?
The file “sniplets/ajax.php” relies on “wp-config.php” to be installed in the WP root directory. WP allows for it to be installed outside of this (either one directory lower or in wp-include), and this plugin does not account for this unfortunately. It’s a quick fix though, but may cause some issues for the less savvy out there.
Yes, and ultimately the plugin needs to load WordPress and so it must be in a known location.
Bah! Cancel my previous comment. It turns out the editor inserted the PRE tags around my shortcode and that was breaking it!! Once I removed the pre tags, it started working.
hi John,
Have not had any problems with this plugin until tonight .. when I go to edit a sniplet I get ..
“You are not allowed access to this resource.”
Have made no alterations to my user profile since installing Sniplets, and have since set up various chunks with no problem.
Only thing I can think that may have an issue ..
Currently I am having to work from behind a proxy .. based in some hell-hole of a place where they banned my site, er, cos I show people how to proxy!
Would it be that, do you think .. really I can’t see why .. or ..
Could it be some incompatibility with WP 2.8.5, which I upgraded to earlier?
Many thanks.
I’m on WP 2.8.6 and I can’t add any sniplets (I’m a new user). Must be incompatibility, as this page — http://wordpress.org/extend/plugins/sniplets/changelog/ — suggests 1.4.4 will include 2.8 compatibility. Something broke, evidently, with 2.8.
Let me edit that last post. 1.4.4 allows me to add sniplets, but when I place the [bracketed name] in a post, it only shows the brackets and name on the resulting post when viewed — it doesn’t replace the name with the content.
Great plugin John!
Currently it seems that each bit of php that’s parsed is unto itself,
so variables cannot be shared between them (unless I set them as ‘global’
within each snippet of php)…
…is this possible to change by using an output buffer somewhere? so
that all php variables used within separate sniplets in a post can be shared?
e.g…at the top of a post:
…then at certain points in the post:
// [to echo ‘that’]
Thanks,
AJ
You’ll need to use global variables to do this.
sorry – code got trampled…
:tries again:
e.g…at the top of a post:
:php $thisVar = ‘that’
…then at certain points in the post:
:php echo $thisVar
// [to show ‘that’]
Hi!
I just found Sniplets and it WOULD be great for my purpose… there is just something i can´t figure out.
I am trying to place code automatically on every page.
Like this
from
<a href="”>
it is working fine when I place the code manually in a page. But somehow it doesn´t work with sniplets.
Can´t Sniplets access custom values from the page it is being used on?
Any help is VERY appreciated!
THX!
John,
Thanks for all the work you’ve put into this plugin.
I’m having trouble getting a shortcode to run from within a sniplet. I’m trying to use amazonsimpleadmin to pull up images with their advertisers API. It uses a shortcode [asa template]ASIN[/asa]
I’m pretty sure I’ve uses shortcodes before, but having no luck with this one. Any thoughts?
Jeff Hajek
only one widget appears in wp 3.0 ?
thanks
I believe this plugin has compatibility issues with WordPress 3.0+.. I noticed a few problems after upgrading my sites to 3.0, such as the words ‘Enter Title Here’, that should be displayed when adding a new post, did not display and some other little hiccups, such as custom fields that acted up until I deactivated Snipplets, then everything was fine. My websites content relies on snipplets to be activated so I’ve decided to keep it activated and just deal with the problems in the dashboard.
Just thought I’d let you know of these issues. Thanks for your hard work involved in this plugin.