![]()
| Download: | Filled In |
|---|---|
| Version: | 1.7.7 |
| Supports: | WordPress 2.9-3.2.1 |
| Other: | This plugin is no longer actively maintained |
Filled In is a generic form processing plugin that will validate and store data submitted through forms. You can use it for any kind of data input, from simple contact forms on a blog to full-blown questionnaires on a business site.
The basic features of Filled In are:
- Customizable data filters and data processors
- Central data storage, with exports to CSV and XML
- Email reporting, with attachments and inline images
- AJAX support (forms always work in browsers without JavaScript)
- Built-in CAPTCHA support
- Built-in poMMo mailing list support
- Built-in file upload support
Read the history for a complete list of features.
Filled In is available in the following languages:
- English
- Italian, thanks to Simone Righini
- French, thanks to Zesty
- Polish, thanks to Kasia
Installation
Installation is like any WordPress plugin:
- Download Filled In
- Unzip
- Upload the
filled-indirectory to/wp-content/pluginson your server - Activate the plugin
Note that if you are upgrading from 1.5 you will need to reconfigure your forms. As much information as possible is retained, but the configuration details of individual filters and processors are not. You are advised to backup your data before upgrading, just in case something bad happens.
You can find full details of installing a plugin on the plugin installation page.
Using Filled In – The Basics
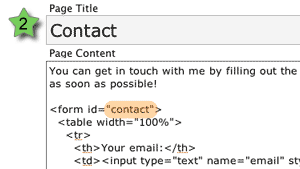
Filled In takes an existing XHTML form (from a post or page) and routes all data submission through it’s own routines, providing you with a consistent interface for managing form validation, data processing, and data storage. In order to route data you give the form an ID that matches a receiving Filled In form name (as created in the Filled In interface).
Create a Filled In form recipient, giving it a unique name.

Create a form (or modify an existing form) and give the form element an ID attribute that matches the Filled In form recipient name.
Look forward to a fully validated form!
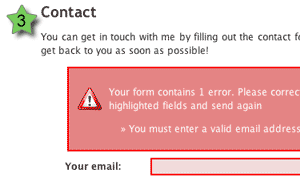
Note that all messages and styles are fully configurable.
If you are unfamiliar with HTML and don’t understand how this all fits together then don’t worry, there are plenty of pictures and even a few movies that will hopefully explain everything. You can use any application you want to create the forms themselves (for example, Dreamweaver), and the only required action is that the form ID must match a Filled In form.
If you were paying attention to the above images you might have noticed that no action or method attribute was needed on the form. As long as the ID can be matched, Filled In will insert the required form attributes, making sure the form is fully functional.
Taking It Further with Extensions
Filled In provides a lot more than just being able to change form attributes. When a form is submitted, Filled In passes the data through several customisable layers. These layers perform all kinds of tasks from validating the data, to sending out email reports.
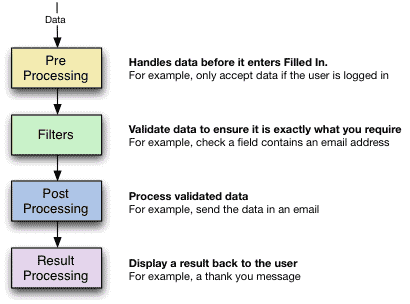
Each layer can have any number of extensions. Filled In comes with a selection of default extensions, and you can download or develop third-party extensions to perform any additional task yourself.
The default extensions are:
- Pre Processors
- Exclude/include fields – remove specified fields
- Must be logged in/out – the user must/must not be logged into WordPress
- Filters
- CAPTCHA – add a CAPTCHA image to a field and ensure the field contents match the image
- Checkbox/Radio – ensures a field is a checkbox or radio button
- File upload – limit upload size and file type
- Is Email – ensure a field contains an email address
- Is Equal/Not Equal To – A logical equality comparison
- Is Greater/Lesser – A logical comparison
- Is Numeric – Ensure the field is a number
- Is Required – Ensure a value is given
- String Length – Ensure a certain number of characters are given
- Word Count – Ensure a certain number of words are given
- Post Processors
- Send as email – send the data in an email with full templating, attachments, and inline images (courtesy of the super Swiftmailer)
- Send to poMMo mailing list
- Save to CSV – suitable for use with Excel
- Save to XML
- Save upload – move uploads into a directory of your choice
- Login to WordPress – take submitted data and use it to login to WordPress
- Register in WordPress – take submitted data and use it to register a new WordPress user
- Result Processors
- Display a message – simple give feedback to the user
- Redirect to a post or URL
- Redisplay input form – pre-filled with original data or empty
If a failure is detected on any layer then the progress of data is stopped, and a message displayed back to the user. Regardless of what happens, all data is stored, allowing you to not only review correct data, but to check what problems people have with a particular form.
The rest of these instructions will be based upon the concept of creating a contact form. Naturally you can adapt the details to any kind of form you want.
Further documentation
You can learn more about using Filled In by reading the documentation or the SDK. Details on certain extensions can be found on the extensions page.
Support & Bugs
This plugin is no longer actively maintained