Configuring Apache
Before we install WordPress we need to configure Apache further. We can do this from the WAMP control menu by selecting the Apache configuration file httpd.conf:
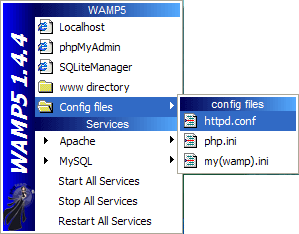
This will open a text editor containing the Apache configuration file.
Virtual hosts
One very nice feature of Apache is its ability to create virtual hosts. Currently we have one webserver running, with one document root. Virtual hosts allow us to add any number of virtual webservers, each with their own document root. They are virtual because they all run under the same instance of Apache – no additional software or ports are required. Apache uses the URL to determine which server a request is for, and changes the document root accordingly.
Why would we be interested in this? Because it allows us to host several websites on one computer. Commercial web hosting companies use the same technique. We can also host several websites on our own computer, if required. Also we could host several copies of the same website, possibly running different versions of WordPress or with different themes.
Creating a virtual host is a two-step process.
Step 1 – Think of a name
We need a unique name for our virtual host. Ideally this name should not already exist on the internet. A nice naming guide is to take your existing domain name and replace the www with local. For example, www.urbangiraffe.com becomes local.urbangiraffe.com.
We need a name so that our Apache webserver can distinguish which virtual host to send the request to. Before we reach that point, we need to tell Windows about our new name.
Edit the file C:windowssystem32driversetchosts and add:
127.0.0.1 local.urbangiraffe.com
Naturally you should change local.urbangiraffe.com to your chosen name. You can add as many names here as you want virtual hosts.
When we browse to a website, our computer takes the URL and looks up an address for the domain using technology known as DNS – Dynamic Naming System. Usually this involves contacting big address databases on the internet, but the hosts file is a way to locally add addresses that only affect our computer.
The reason we choose a unique name is because local addresses override DNS addresses. If we call our local site www.microsoft.com and direct it to the loopback address, any attempt to access the Microsoft website would be redirected to our own server.
Step 2 – Modifying httpd.conf
We need to define each virtual host in the Apache configuration. Add the following to the end of the httpd.conf configuration file:
NameVirtualHost 127.0.0.1

<VirtualHost 127.0.0.1>
  DocumentRoot "C:/wamp/www"
  ServerName localhost
</VirtualHost>

<VirtualHost 127.0.0.1>
  DocumentRoot "C:/wamp/www/urbangiraffe.com"
  ServerName local.urbangiraffe.com
  ErrorLog logs/urbangiraffe_error.log
</VirtualHost>
Here two virtual hosts have been defined. One for the normal localhost address, which we tested previously, and another for a local copy of the urbangiraffe.com website. You should modify the second host to match the name defined in the hosts file.
The DocumentRoot can be set to any location you want. In the example above it has been set to a subdirectory of the main website. Whatever location you choose, you must ensure the directory exists.
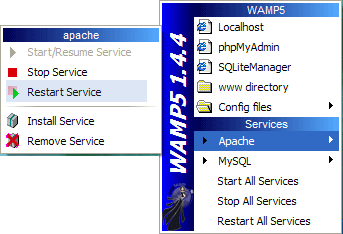
Once all changes have been made you need to restart the Apache server. This can be done directly from the WAMP menu.
Before we can test our new configuration we need files in the virtual host root directory. Create a file called phpinfo.php and insert the following text into it:
<?php phpinfo(); ?>
That’s all you need. This little file contains a PHP function that displays the current PHP configuration. It’s a handy function to show what you have installed.
Now test the virtual host by browsing to the URL:
http://local.urbangiraffe.com/phpinfo.php
Of course, change the domain name to your chosen name.
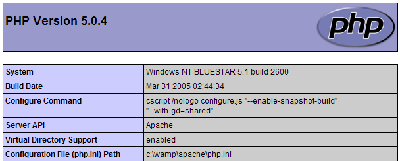
If all goes well you will have a screen displaying PHP information:
We can test the mod_rewrite functionality by creating a .htaccess file in our root directory:
RewriteEngine on
RewriteRule ^test.php$ phpinfo.php
All this does is setup a rewrite rule that tells Apache to use phpinfo.php whenever the URL is for test.php. If you now browse to:
http://local.urbangiraffe.com/test.php
You should get the same information screen as for phpinfo.php.
Hi John
I followed your tutorial (very good and easy to understand) but at the point where i was asked to edit the:
“$cfg[‘Servers’][$i][‘user’] = ‘root’; // MySQL user
$cfg[‘Servers’][$i][‘password’] = ”; // MySQL password”
in the config.inc.php file I hit a brick wall as the above text is not in the config file so I cannot add the password.
I have tried uninstalling and re installing but I still get the same error (Http 403 forbidden) message when
I try to log into the phpMyAdmin
Any suggestions?
Marc, it looks like a newer version of the software may have changed the location. You should head on over to phpMyAdmin to find the new password location
Finally a good explanation about wordpress installation, I’ve found this tutorial already but this one is the most detailed…
It will be great to explain how to switch this install as a server, and not only as a local site. It will be great if you could explain it…(Stuck to the RSS comment)
When I tried to install wordpress by entering:”http://localhost/wordpress/wp-admin/install.php” into the url of the browser, I got the following respond:”Fatal error: Call to undefined function did_action() in C:\xampplite\htdocs\wordpress\wp-includes\functions.php on line 1345
“What went wrong?
You should direct this question to the wordpress.org support forums
my current url is http://www.abc.com/page/aboutus and this url i want to change it to
http://www.abc.com/aboutus …so for this i have tried with the redirect plugin .but still its not working ..
any other options plz help me out..
A thousand thank you’s for this tutorial.
Great post.
Hello!
Very Interesting post! Thank you for such interesting resource!
PS: Sorry for my bad english, I’v just started to learn this language 😉
See you!
Your, Raiul Baztepo
I had to reformat my hard drive and, as a result, needed to reinstall WampServer and WordPress. Originally, I followed the tutorial and had three separate WordPress blogs running on my local machine.
This time, I’ve installed WampServer 2.0. I’ve edited my hosts, httpd.conf file and created the phpinfo.php file (all with Notepad++). My host file includes:
127.0.0.1 localhost
127.0.0.1 local.dcblog.com
and, to the end of my httpd.conf file, I added:
NameVirtualHost 127.0.0.1
DocumentRoot “C:/wamp/www”
ServerName localhost
DocumentRoot “G:/Root/www/dcblog.com”
ServerName local.dcblog.com
ErrorLog logs/dcblog_error.log
When I try the “localhost” url, I get the WampServer homepage.
However, when I try “local.dcblog.com” I get a 403 Forbidden. You don’t have permission to access /phpinfo.php on this server.
The directory “G:/Root/www/dcblog” exists on my G drive. I’ve tried different variations including dropping the idea of using a different drive; going back and using the tutorial’s original Document root. Same problem.
Any suggestions on how to correct this error? This is the same config I had before, but this time I just can’t seem to tweak the system to behave.
As a followup to my previous question: I finally chucked wampserver 2.0 and used Revouninstaller to completely uninstall. I made sure everything was gone, including any subdirectories. I then reinstalled WAMP5 v. 1.7.4. Same problems and error messages as with wampserver. I’ve googled the problem and found it is not unusual and is probably related to how I have the directories configured within http.conf. However, no matter how I twiddle with it, I can’t find a solution. I want my wordpress files to reside on a drive other than ‘C’. I had it working once; now, I’m stumped. Thanks!
o.k. I “solved” my problem by digging DEEP and finally found a backup of my original http.conf file. Replaced my new http.conf with the old one and: success. I’m still curious as to WHY the new install wouldn’t work. I’m convinced its operator error, but have not been able to dig it out.
John — Thanks for a great tutorial. One question:
Do I need to write .htaccess and mod_rewrite rules to redirect the external links to blog posts (that came in with my import of my online blog database) to the new locations within the imported version of my database?
Sean
Hi John — here’s a bit more info:
– my blog index.php comes up fine at local.profitscapes.com . I see all the pics, text, etc as the online version.
– every link to a blog post, category, etc., however, points to its online location (for example, http://profitscapes.com/2009/04/new-ways-for-attorneys-to-grow-billable-hours/ ) — NOT my local version. I checked my local database, and the data is there, but the wp_posts field holds links to the online locations.
Thoughts?
Thanks,
Sean
Hi John,
I’ve figured out a few things — I tweaked my database siteurl and home settings so that now my blog posts, pics, etc. point to a local source, but when I click on any blog post, I get a 404 error.
A sample broken link:
http://local.profitscapes.com/2009/04/new-ways-for-attorneys-to-grow-billable-hours/
My virtual host info is:
# NameVirtualHost 127.0.0.1
#
# DocumentRoot “C:/xampp/htdocs”
# ServerName localhost
#
#
# DocumentRoot “C:/xampp/htdocs/BurnsGroup_Site/blog”
# ServerName local.profitscapes.com
#
#
# DocumentRoot “C:/xampp/htdocs/BurnsGroup_Site/consult”
# ServerName local.consult.profitscapes.com
#
Any tips would be greatly appreciated,
Sean
Really useful stuff. Explained nicely. keep writing new ideas…
Thanks!!!
Two years later and this tutorial proves to be easily followed and an absolute fantastic resource! Thanks so much!
Hi John,
Thanks for the tutorial!
I’m a bit stuck with the wordpress installation. I can get as far as the page that asks for Blog title and email. From another tutorial, I gather that i am supposed to see a “Successful installation” message with my login and password. However, my page stays stuck after i key in blog title and email.
Any idea how to resolve this or what did I miss? Thanks in advance!
This was an awesome tutorial. One of the most unambiguous I’ve come across. Everything worked first time.
Thanks
Hi John, Thanks for the great tutorial which I’ve used successfully on Windows XP. The instructions are very clearly explained and the accompanying images are so useful.
However, I’ve just purchased a new Windows Vista computer and I’m stuck on page 3 of your tutorial – I can’t locate the “host” file in the Windows 32 system, drivers, etc folder – there isn’t such a folder. Plus there’s also a Windows 64 bit system folder.
Any advice on how to finish installing WAMP on the Vista system would be greatly appreciated as I have several sites in development that I’d like to use the new computer for.
Cheers, and thanks in advance for any help you can give ……..
Oops – turns out all I needed to do was turn on the hidden files to find the etc folder and the host file. Thanks to the folks at sitepoint.com forum who pointed that out to me!
Thank you, thank you, thank you! This is just what I was looking for. I’m a newbie to web design and PHP etc., but have been tasked with redoing my small library’s website. After deciding to use WordPress as the CMS, our tech guy wouldn’t allow me to install it on our local server until I “knew what to do.” Now I’ll do the install on my local computer until I get the hang of it. I’ll show him!! 🙂 Thanks again.
I have a problem with phpMyAdmin. When I load it from the link on the WAMP homepage, it gives me the error “Cannot load mysqli extension. Please check your PHP configuration. – Documentation.” I checked the documentation and it says that the mysqli extension not being found means that php_mysql.dll can’t be found. I checked the php bin that came with WAMP and in /php/ext/ the file php_mysql.dll is there. I changed php.ini to have the following:
...

;extension_dir = "./"

extension_dir = "./ext"

...

;extension=php_mysql.dll

extension=php_mysql.dll

...
Thats what another site said to do, and that didn’t work. I added the file libmySQL.dll to my system32 folder which another site said to do, and that didn’t work. Can anyone tell me how I can get mySQL to find php_mysql.dll?
Hi John
I followed your tutorial (very good and easy to understand) but at the point where i was asked to edit the:
“$cfg[‘Servers’][$i][‘user’] = ‘root’; // MySQL user
$cfg[‘Servers’][$i][‘password’] = ”; // MySQL password”
in the config.inc.php file I hit a brick wall.
the path to config.inc.php i have in the new wamp software is x:\wamp\apps\phpmyadmin3.2.0.1\config.inc.php
When i change the password in that file all i get is;
Error
MySQL said: Documentation
#1045 – Access denied for user ‘root’@’localhost’ (using password: NO)
when i try to connect to phpmyadmin
i just cant get this to work please help?
not sure why others are having a problem doing this. It was pretty clear how to install WordPress using WAMP from reading your post. I think I’m going to test this out, only this time, i’ll use Apache on Ubuntu 🙂
Thank you so much 🙂
I already had a local installation of wordpress on wamp but I needed to develop two more sites and was getting the ebejeebies at how that was going to happen without running into loads of problems. After a bit of searching and lots of – no hit but plenty of miss – I came across your instructions and it worked like a dream.
I now have three installations of wordpress running from the same installation of wampserver 2.1e
You are the dogs 😉
Hi John,
Looked at your instructions but not sure if your site is applicable to what I want to do. I want to know if I can download the WordPress installation to create my own website to a location like a flash drive and/or a Windows computer so I can take it with me and be able to work on my site from another computer other than my own laptop, which is a 2004 macbook.
Thanks,
John H